Okio 源码分析
史前大坑更新,来分析一下 Okio 的源码 。
- 官方文档: Okio (square.github.io)
官方文档翻译
Source & Sink
// okio.Source
actual interface Source : Closeable {
  @Throws(IOException::class)
  actual fun read(sink: Buffer, byteCount: Long): Long

  actual fun timeout(): Timeout

  @Throws(IOException::class)
  actual override fun close()
}

// okio.Sink
actual interface Sink : Closeable, Flushable {
  @Throws(IOException::class)
  actual fun write(source: Buffer, byteCount: Long)

  @Throws(IOException::class)
  actual override fun flush()

  actual fun timeout(): Timeout

  @Throws(IOException::class)
  actual override fun close()
}
直接就是规定了接口,这里 actual 是跨平台的相关语法,这里无需关心。
以下是继承图:
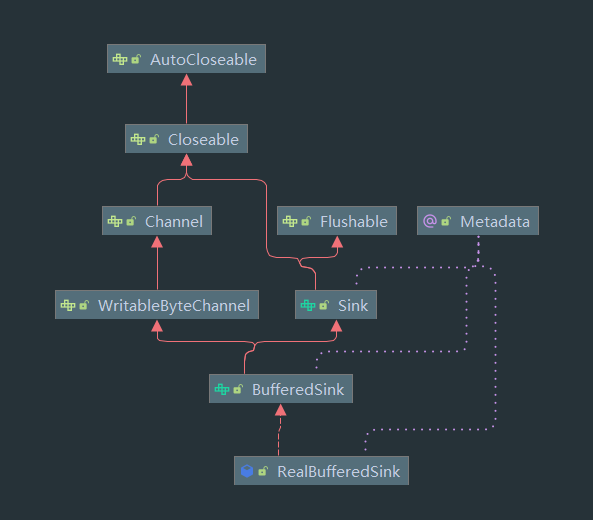
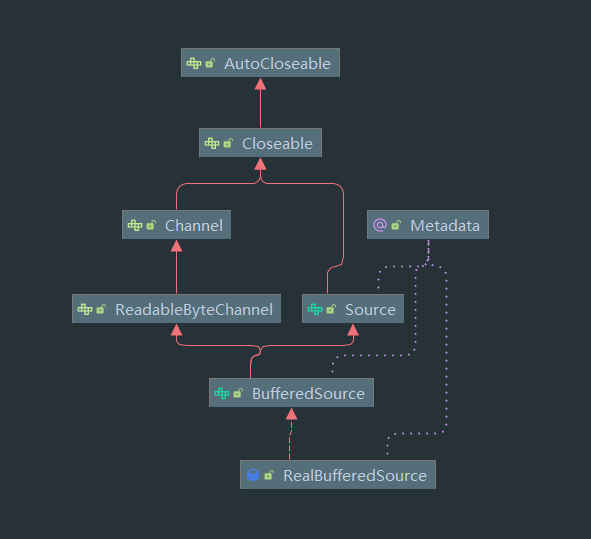
可以看到最终实现类都会来到 RealBufferedSource 与 RealBufferedSink 两个类接下来会分析这两个类的写入和读取操作,这里先来看 BufferedSink 的接口,BufferedSource 类似:
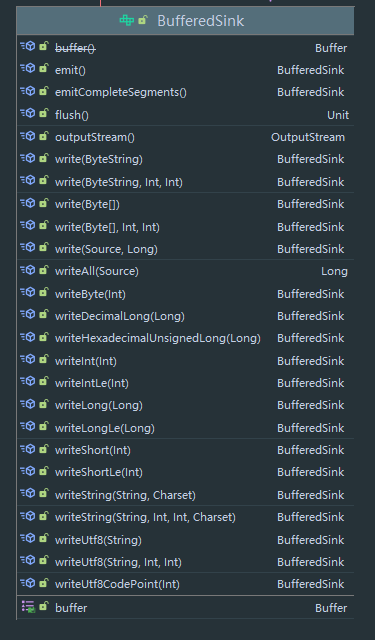
可看到规定了一系列方法,同时持有一个 Buffer 对象,实际上,在最终的视线中,大部分操作都是通过 Buffer 对象实现的。
Buffer & Segment
Buffer 中的数据不是直接储存的,而是储存了一个 Segment 链表,Segment 才是最终数据的载体。
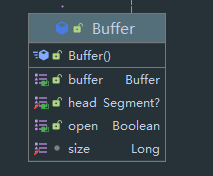
这里省去了方法,可以看到该类主要的成员变量有三个(其中第一个为继承父类返回 this 的标记,实际上就是 this),分别是 Segment 头节点 head,开关标记 open 与 长度 size 。
接下来是 Segment
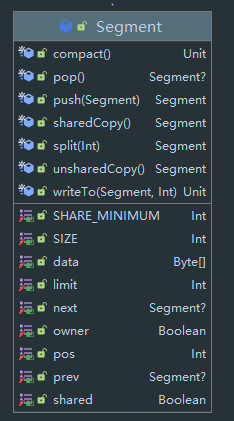
可以看到几个标记,其中 data 为数据,limit 为数据长度,pos 为当前指针。prev 与 next 为双向链表指针域。这里主要有两个标记需要注意:
- owner data 的数据是否属于该 Segmemt,如果属于,则代表该 Segment 可以从该 data 后 append 数据。
- shared 是否有其他 Segment 或 ByteStrings 持有 data
注意,一个 Segment 中的数据由三部分决定,首先是 byteArray 的 data,然后是 pos 与 limit,也就是 data 中 index 从 pos 到 limit 个字节的数据才是该 Segment 的数据,之后切割过程的图示会更加明显。
数据从 buffer 中进行移动的时候,实际上是以 Segment 为单位,在某些情况,为了加快效率,直接将 ByteArray 的指针赋值给另一个 Segment 。在此过程中需要用到这两个标记,在之后的分析也会出现。
这里先给出链表的两个操作,比较简单:
// Segment#pop()
fun pop(): Segment? {
    val result = if (next !== this) next else null
    prev!!.next = next
    next!!.prev = prev
    next = null
    prev = null
    return result
}

// Segment#push()
fun push(segment: Segment): Segment {
    segment.prev = this
    segment.next = next
    next!!.prev = segment
    next = segment
    return segment
}
其中 pop 方法从链表中删除该节点,然后返回下一个节点。
push 方法在节点后一个位置插入节点。
然后来看看共享的相关方法,首先是 split:
/**
 * 对该 Segment 进行切割
 * byteCount : 切割的大小
 */
fun split(byteCount: Int): Segment {
    // 确保 byteCount 合法
    require(byteCount > 0 && byteCount <= limit - pos) { "byteCount out of range" }
    val prefix: Segment

    // We have two competing performance goals:
    //  - Avoid copying data. We accomplish this by sharing segments.
    //  - Avoid short shared segments. These are bad for performance because they are readonly and
    //    may lead to long chains of short segments.
    // To balance these goals we only share segments when the copy will be large.

    // 我们有两个目标
    // - 防止复制数据,直接将此节点设置为共享节点
    // - 防止短的共享节点数据,因为共享节点本身也会造成性能开销,短数据可能比直接复制还消耗性能,同时可能导致短的 Segment 组成过长的链表
    // 为了平衡这两点,我们设定了一个阈值
    if (byteCount >= SHARE_MINIMUM) {
        // 当需要复制的数据大于阈值,则进行共享
        prefix = sharedCopy()
    } else {
        // 否则 从 SegmentPool 中取出一个新的 Segment,并直接对 data 进行 copy
        prefix = SegmentPool.take()
        data.copyInto(prefix.data, startIndex = pos, endIndex = pos + byteCount)
    }
	// 这里将新 Segment 的 limit 赋值
    prefix.limit = prefix.pos + byteCount
    // 旧 Segment 的 pos 设置
    pos += byteCount
    // 插入旧 Segment 之前
    prev!!.push(prefix)
    // 返回新的 Segment
    return prefix
}

// 创建分享节点
fun sharedCopy(): Segment {
    // 设置本节点标记
    shared = true
    // 使用同一个 data 构造新的 Segment
    return Segment(data, pos, limit, true, false)
}
该方法将 Segment 进行切割,并根据切割的 size 来判断是否需要复制 。这里 SHARE_MINIMUM 默认为 1024
这里给出图示:
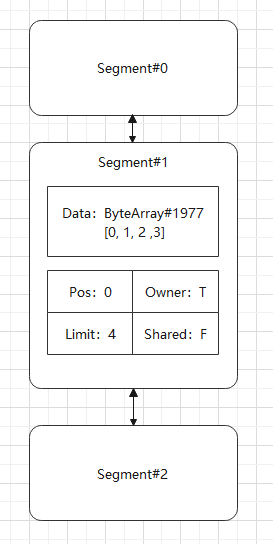
首先链表中有一个 Segment 不是共享节点,并且是该数据的 owner,以下是初始状态:
这里我们假设 SHARE_MINIMUM 为 3,首先我们调用 split(3) 进行切割,切割后将会如下:
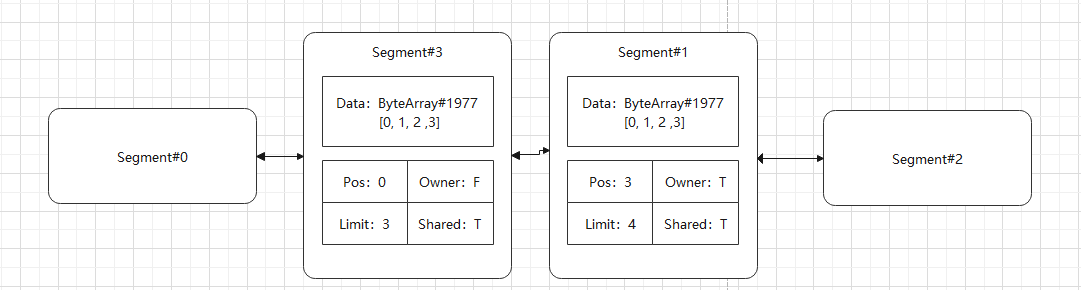
可以看到,对于该链表,Segment#3 与 Segment#1 中 data 的数据实际上是同一个,只不过 Pos 与 Limit 不同,并且只有一个节点的 Owner 标记为 true,同时两个节点所有 Shared 标记都为 true。
而对于非共享分割,效果不一样,假设调用 split(2):
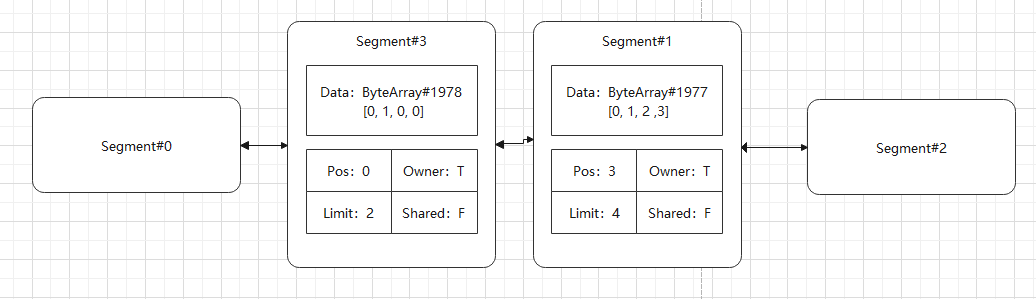
可以看到这里重新构造了一个新的 ByteArray 。
这里需要知道有这两种切割方式即可,后面会分析到这种机制的作用。
接下来是 writeTo 方法,该方法用于将本 Segment 的数据写入传入的 Segment 中:
// 将本 Segment 中 byteCount 字节的数据移动到 sink 的 Segment 中
fun writeTo(sink: Segment, byteCount: Int) {
    // 只有传入的 sink 是可写入的才合法
    check(sink.owner) { "only owner can write" }
    // 判断 sink 中 limit 之后是否有足够空间可以写入,如果没有,则将 pos 之前的数据全部清除
    if (sink.limit + byteCount > SIZE) {
        // We can't fit byteCount bytes at the sink's current position. Shift sink first.
        // 这里需要确保 sink 中的 data 没有被共享
        if (sink.shared) throw IllegalArgumentException()
        // 这里需要确保 sink 中的 data 足够写入 sink 之后的数据加上 byteCount 个字节的数据
        if (sink.limit + byteCount - sink.pos > SIZE) throw IllegalArgumentException()
        // 将 pos 之前的数据全部清除
        sink.data.copyInto(sink.data, startIndex = sink.pos, endIndex = sink.limit)
        sink.limit -= sink.pos
        sink.pos = 0
    }

    // 写入数据
    data.copyInto(sink.data, destinationOffset = sink.limit, startIndex = pos,
                  endIndex = pos + byteCount)
    // 相关指针移动
    sink.limit += byteCount
    pos += byteCount
}
该方法的的目的为将 Segment 中的 byteCount 个字节的数据写入到 sink 中,然后进行了一系列合法判断与空间释放,这里逻辑还是比较好理解。
然后是 compact 方法, 用于将一个节点与前一个节点合并,当然其中有各种合法判断和指针操作:
 // 将本节点与前一个节点合并
fun compact() {
    // 不是头节点
    check(prev !== this) { "cannot compact" }
    // 前一个节点可写
    if (!prev!!.owner) return // Cannot compact: prev isn't writable.
    // 需要写入的数据长度
    val byteCount = limit - pos
    // 前一个节点能写入的空间
    val availableByteCount = SIZE - prev!!.limit + if (prev!!.shared) 0 else prev!!.pos
    // 不够写入
    if (byteCount > availableByteCount) return // Cannot compact: not enough writable space.
    // 写入
    writeTo(prev!!, byteCount)
    // 删除本节点
    pop()
    // 回收本节点
    SegmentPool.recycle(this)
}
至此 Segment 的相关操作都分析完毕。
RealBufferSource & RealBufferSink
首先回顾一下我们对文件的读取:
@Throws(IOException::class)
fun readLines(file: File) {
  file.source().use { fileSource ->
    fileSource.buffer().use { bufferedFileSource ->
      while (true) {
        val line = bufferedFileSource.readUtf8Line() ?: break
        if ("square" in line) {
          println(line)
        }
      }
    }
  }
}
首先是 file.source() 扩展方法:
@Throws(FileNotFoundException::class)
fun File.source(): Source = inputStream().source()

public inline fun File.inputStream(): FileInputStream {
    return FileInputStream(this)
}

fun InputStream.source(): Source = InputStreamSource(this, Timeout())
可以看到这里首先构造了一个 FileInputStream 对象,然后调用 source 方法构造了一个 InputStreamSource,这是一个内部类:
private class InputStreamSource(
    private val input: InputStream,
    private val timeout: Timeout
) : Source {

    override fun read(sink: Buffer, byteCount: Long): Long {
        if (byteCount == 0L) return 0
        require(byteCount >= 0) { "byteCount < 0: $byteCount" }
        try {
            timeout.throwIfReached()
            val tail = sink.writableSegment(1)
            val maxToCopy = minOf(byteCount, Segment.SIZE - tail.limit).toInt()
            val bytesRead = input.read(tail.data, tail.limit, maxToCopy)
            if (bytesRead == -1) {
                if (tail.pos == tail.limit) {
                    // We allocated a tail segment, but didn't end up needing it. Recycle!
                    sink.head = tail.pop()
                    SegmentPool.recycle(tail)
                }
                return -1
            }
            tail.limit += bytesRead
            sink.size += bytesRead
            return bytesRead.toLong()
        } catch (e: AssertionError) {
            if (e.isAndroidGetsocknameError) throw IOException(e)
            throw e
        }
    }

    override fun close() = input.close()

    override fun timeout() = timeout

    override fun toString() = "source($input)"
}
可以看到这里主要是将 InputStream 与 Source 对应起来,这里我们重点分析 read 方法:
// 从 InputStream 中读取 byteCount 字节数据,然后放入 sink 这个 Buffer 中 返回读取的长度
override fun read(sink: Buffer, byteCount: Long): Long {
    // 为 0 直接不用读
    if (byteCount == 0L) return 0
    // byteCount 合法判断
    require(byteCount >= 0) { "byteCount < 0: $byteCount" }
    try {
        // 超时判断
        timeout.throwIfReached()
        // 这里获取 sink 尾部中一个可写节点
        val tail = sink.writableSegment(1)
        // 需要复制的最小数据
        val maxToCopy = minOf(byteCount, Segment.SIZE - tail.limit).toInt()
        // 读取数据
        val bytesRead = input.read(tail.data, tail.limit, maxToCopy)
        // 如果没有读取数据
        if (bytesRead == -1) {
            // 刚刚申请的 tail 可能是新 Segment
            // 此时进行释放
            if (tail.pos == tail.limit) {
                // We allocated a tail segment, but didn't end up needing it. Recycle!
                sink.head = tail.pop()
                SegmentPool.recycle(tail)
            }
            return -1
        }
        // 指针移动
        tail.limit += bytesRead
        sink.size += bytesRead
        return bytesRead.toLong()
    } catch (e: AssertionError) {
        if (e.isAndroidGetsocknameError) throw IOException(e)
        throw e
    }
}
其中调用了 sink.writableSegment(1) 方法,来看看:
internal actual fun writableSegment(minimumCapacity: Int): Segment =
commonWritableSegment(minimumCapacity)


internal inline fun Buffer.commonWritableSegment(minimumCapacity: Int): Segment {
    require(minimumCapacity >= 1 && minimumCapacity <= Segment.SIZE) { "unexpected capacity" }

    // 链表为空,申请新 Segment
    if (head == null) {
        val result = SegmentPool.take() // Acquire a first segment.
        head = result
        result.prev = result
        result.next = result
        return result
    }

    // 获取尾节点
    var tail = head!!.prev
    // 如果尾节点不够写入 minimumCapacity 数据或者尾节点不可写,则申请新 Segment
    if (tail!!.limit + minimumCapacity > Segment.SIZE || !tail.owner) {
        tail = tail.push(SegmentPool.take()) // Append a new empty segment to fill up.
    }
    return tail
}
我们得到了一个 Source 对象,然后回到最初,我们调用了 buffer() 方法构造了一个 Buffer():
fun Source.buffer(): BufferedSource = RealBufferedSource(this)
可以看到这里构造了一个 RealBufferedSource 实例,因此我们的操作都使用该对象完成。
该实例有许多方法,但只是进行一些封装,这里我们以最简单的方法为例:
override fun read(sink: ByteArray): Int = read(sink, 0, sink.size)

override fun read(sink: ByteArray, offset: Int, byteCount: Int): Int =
commonRead(sink, offset, byteCount)
该方法是最简单的方法,直接将数据读取到 ByteArray 中,可以看到这里最终是调用了 commonRead 方法,该方法为扩展方法:
internal inline fun RealBufferedSource.commonRead(sink: ByteArray, offset: Int, byteCount: Int): Int {
    checkOffsetAndCount(sink.size.toLong(), offset.toLong(), byteCount.toLong())

    if (buffer.size == 0L) {
        val read = source.read(buffer, Segment.SIZE.toLong())
        if (read == -1L) return -1
    }

    val toRead = okio.minOf(byteCount, buffer.size).toInt()
    return buffer.read(sink, offset, toRead)
}
这里先判断 buffer 中是否存有数据,如果没有则从 source 中读取,source.read 刚刚已经分析了。
因此最后会来到 buffer.read(sink, offset, toRead),这里我们猜测该方法是将 buffer 中数据写进 sink 。
回到 RealBufferedSource,这里 buffer 变量为 Buffer 对象:
@JvmField val bufferField = Buffer()
因此来到 Buffer.read 方法:
override fun read(sink: ByteArray, offset: Int, byteCount: Int): Int =
commonRead(sink, offset, byteCount)

internal inline fun Buffer.commonRead(sink: ByteArray, offset: Int, byteCount: Int): Int {
    // 合法判断
    checkOffsetAndCount(sink.size.toLong(), offset.toLong(), byteCount.toLong())
	// 从头节点开始读取
    val s = head ?: return -1
    val toCopy = minOf(byteCount, s.limit - s.pos)
    // 读取数据
    s.data.copyInto(
        destination = sink, destinationOffset = offset, startIndex = s.pos, endIndex = s.pos + toCopy
    )
    // 变更指针
    s.pos += toCopy
    size -= toCopy.toLong()

    // 如果读取后数据为空,则回收 Segment
    if (s.pos == s.limit) {
        head = s.pop()
        SegmentPool.recycle(s)
    }

    return toCopy
}
至此,读取的过程都分析完毕,可喜可贺。
对于 RealBufferSink ,类似。
减少拷贝
接下来将进入 okio 的重点优化场景,也就是在 source 与 sink 之间进行数据交互时的 Segment 优化。
首先是该方法:
// RealBufferedSource.read
override fun read(sink: Buffer, byteCount: Long): Long = commonRead(sink, byteCount)

//RealBufferedSource.commonRead
internal inline fun RealBufferedSource.commonRead(sink: Buffer, byteCount: Long): Long {
  require(byteCount >= 0) { "byteCount < 0: $byteCount" }
  check(!closed) { "closed" }

  if (buffer.size == 0L) {
    val read = source.read(buffer, Segment.SIZE.toLong())
    if (read == -1L) return -1L
  }

  val toRead = minOf(byteCount, buffer.size)
  return buffer.read(sink, toRead)
}
最终还是来到 Buffer.read,继续深入:
// Buffer.read
override fun read(sink: Buffer, byteCount: Long): Long = commonRead(sink, byteCount)

// Buffer.commonRead
internal inline fun Buffer.commonRead(sink: Buffer, byteCount: Long): Long {
    var byteCount = byteCount
    require(byteCount >= 0) { "byteCount < 0: $byteCount" }
    if (size == 0L) return -1L
    if (byteCount > size) byteCount = size
    sink.write(this, byteCount)
    return byteCount
}
最终来到目标 Buffer 的 wirte 方法,最终来到 Buffer.commonWrite,可以看到该方法注释很多,因此比较重要,这也是 Segment 机制性能优化的核心。
// Buffer.write
override fun write(source: Buffer, byteCount: Long): Unit = commonWrite(source, byteCount)

// Buffer.commonWrite
internal inline fun Buffer.commonWrite(source: Buffer, byteCount: Long) {
    var byteCount = byteCount
    // Move bytes from the head of the source buffer to the tail of this buffer
    // while balancing two conflicting goals: don't waste CPU and don't waste
    // memory.
    //
    //
    // Don't waste CPU (ie. don't copy data around).
    //
    // Copying large amounts of data is expensive. Instead, we prefer to
    // reassign entire segments from one buffer to the other.
    //
    //
    // Don't waste memory.
    //
    // As an invariant, adjacent pairs of segments in a buffer should be at
    // least 50% full, except for the head segment and the tail segment.
    //
    // The head segment cannot maintain the invariant because the application is
    // consuming bytes from this segment, decreasing its level.
    //
    // The tail segment cannot maintain the invariant because the application is
    // producing bytes, which may require new nearly-empty tail segments to be
    // appended.
    //
    //
    // Moving segments between buffers
    //
    // When writing one buffer to another, we prefer to reassign entire segments
    // over copying bytes into their most compact form. Suppose we have a buffer
    // with these segment levels [91%, 61%]. If we append a buffer with a
    // single [72%] segment, that yields [91%, 61%, 72%]. No bytes are copied.
    //
    // Or suppose we have a buffer with these segment levels: [100%, 2%], and we
    // want to append it to a buffer with these segment levels [99%, 3%]. This
    // operation will yield the following segments: [100%, 2%, 99%, 3%]. That
    // is, we do not spend time copying bytes around to achieve more efficient
    // memory use like [100%, 100%, 4%].
    //
    // When combining buffers, we will compact adjacent buffers when their
    // combined level doesn't exceed 100%. For example, when we start with
    // [100%, 40%] and append [30%, 80%], the result is [100%, 70%, 80%].
    //
    //
    // Splitting segments
    //
    // Occasionally we write only part of a source buffer to a sink buffer. For
    // example, given a sink [51%, 91%], we may want to write the first 30% of
    // a source [92%, 82%] to it. To simplify, we first transform the source to
    // an equivalent buffer [30%, 62%, 82%] and then move the head segment,
    // yielding sink [51%, 91%, 30%] and source [62%, 82%].

    require(source !== this) { "source == this" }
    checkOffsetAndCount(source.size, 0, byteCount)

    while (byteCount > 0L) {
        // Is a prefix of the source's head segment all that we need to move?
        if (byteCount < source.head!!.limit - source.head!!.pos) {
            val tail = if (head != null) head!!.prev else null
            if (tail != null && tail.owner &&
                byteCount + tail.limit - (if (tail.shared) 0 else tail.pos) <= Segment.SIZE) {
                // Our existing segments are sufficient. Move bytes from source's head to our tail.
                source.head!!.writeTo(tail, byteCount.toInt())
                source.size -= byteCount
                size += byteCount
                return
            } else {
                // We're going to need another segment. Split the source's head
                // segment in two, then move the first of those two to this buffer.
                source.head = source.head!!.split(byteCount.toInt())
            }
        }

        // Remove the source's head segment and append it to our tail.
        val segmentToMove = source.head
        val movedByteCount = (segmentToMove!!.limit - segmentToMove.pos).toLong()
        source.head = segmentToMove.pop()
        if (head == null) {
            head = segmentToMove
            segmentToMove.prev = segmentToMove
            segmentToMove.next = segmentToMove.prev
        } else {
            var tail = head!!.prev
            tail = tail!!.push(segmentToMove)
            tail.compact()
        }
        source.size -= movedByteCount
        size += movedByteCount
        byteCount -= movedByteCount
    }
}
首先我们先来翻译以下该注释:
/*
将字节流数据从 source buffer 的头部移动到本 buffer 的尾部,这里需要完成两个目的:
不要浪费 CPU 和 不要浪费 内存

不要浪费 CPU (也就是说 不要复制数据)

复制大量的数据是耗时的,因此我们更倾向于直接移动整个 Segments

不要浪费 内存

我们规定了一个规则,一个 Buffer 中的每一个相邻 Segments 对应该至少存百分之 50 的数据,即 ByteArray 中的有效数据应该大于百分之 50。当然头结点和尾结点除外。

头结点因为程序需要从这里读取数据,因此不规定该规则,否则读取的同时就需要重新分配 Segment 链表

尾结点因为程序需要从这里写入,因此不规定改规则,我们经常需要从尾部新建空节点来让应用程序写入哪怕很少的数据。

在两个 buffer 中移动 segment

当我们在两个 buffer 中移动数据时,我们更倾向于重新分配新的 segment 而不是将数据复制为最紧凑的形式(在旧的某个 segment 中复制会让链表更紧凑)。
例如我们有一个 Segment 链表,其中每个 Segment 的等级(有效数据占比)为: [91%, 61%],如果我们在之后写入一个等级为 72% 的 Segment,最终将会变成 [91%, 61%, 72%]。(如果想变得紧凑,则需要复制数据,变成 [91%, 100%, 33%]),这其中没有数据复制。

或者如果我们有一个 Segment 链表 [100%, 2%],然后我们需要从后追加数据 [99%, 3%],我们将会直接将链表接上 [100%, 2%, 99%, 3%]。 我们不会复制数据来追求更高的内存使用效率,即我们不会变成 [100%, 100%, 4%] (实际上还是存在一些情况的写入,之后源码分析会说明,这里只是简单举例说明 Segment 移动的性能优化)

当我们合并 buffers 时,我们将尝试合并相邻的 Segment,例如如果我们需要将 [100%, 40%] 与 [30%, 80%] 两个 buffers 合并,结果将为 [100%, 70%, 80%]  (个人理解是为了保持前面的规则,相邻的可用数据达到 50 以上)

切割 Segment
有时候我们只需要将 source buffer 中的一部分数据写入 sink buffer,例如,有 sink [51%, 91%], 和 source [92%, 82%],我们需要将 source 中前 30% 数据写入 sink 中。为了简化这个过程,我们会先对 source 进行切割,使其变成 [30%, 62%, 82%] (这里可能会有数据复制,也可能没有,看之前的 split 方法),然后将头 Segment 移动到 sink 中,最终 sink [51%, 91%, 30%] 和 source [62%, 82%]
*/
接下来我们去掉注释,直接来看该方法:
internal inline fun Buffer.commonWrite(source: Buffer, byteCount: Long) {
    var byteCount = byteCount

    // 合法检查
    require(source !== this) { "source == this" }
    checkOffsetAndCount(source.size, 0, byteCount)

    while (byteCount > 0L) {
        // 如果 byteCount 小于头结点的数据,则我们需要移动或切割
        if (byteCount < source.head!!.limit - source.head!!.pos) {
            // 获取尾结点,准备写入
            val tail = if (head != null) head!!.prev else null
            // 如果尾结点可写,并且空间足够写入
            if (tail != null && tail.owner &&
                byteCount + tail.limit - (if (tail.shared) 0 else tail.pos) <= Segment.SIZE) {
                // 直接复制数据
                source.head!!.writeTo(tail, byteCount.toInt())
                source.size -= byteCount
                size += byteCount
                // 直接写入完毕
                return
            } else {
                // 旧尾结点无法写入,我们需要新增节点,此时对 source 头结点进行切割
                source.head = source.head!!.split(byteCount.toInt())
            }
        }

        // 移除 source 的头结点并将其放入 此 buffer 的尾结点,这里已经做了切割等操作,直接设置
        val segmentToMove = source.head
        val movedByteCount = (segmentToMove!!.limit - segmentToMove.pos).toLong()
        source.head = segmentToMove.pop()
        if (head == null) {
            head = segmentToMove
            segmentToMove.prev = segmentToMove
            segmentToMove.next = segmentToMove.prev
        } else {
            var tail = head!!.prev
            tail = tail!!.push(segmentToMove)
            // 写入后旧节点变为倒数第二节点,需要满足我们的规则,因此这里尝试合并
            tail.compact()
        }

        // 设置相关标记
        source.size -= movedByteCount
        size += movedByteCount

        // 写入数据减少,继续下次循环
        byteCount -= movedByteCount
    }
}
Timeout
okio 抽象出了一个 Timtout 类,专门用于超时的相关操作,继承图:

首先是 Timeout,来看结构图:
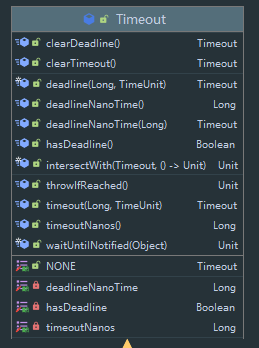
首先是变量,具有一个 timeoutNanos,以微妙为单位,设定的单个任务超时时间,其次还有一个 deadlineNanoTime,以微妙为单位设定的截止时间戳,此外还有 hashDeadline 表示 deadlineNanoTime 是否有效 。
然后是一系列支持链式调用的 setterr 和 getter 方法用来设置这两种时间。
然后我们来看几个方法:
/**
   * Throws an [InterruptedIOException] if the deadline has been reached or if the current thread
   * has been interrupted. This method doesn't detect timeouts; that should be implemented to
   * asynchronously abort an in-progress operation.
   */
@Throws(IOException::class)
open fun throwIfReached() {
    if (Thread.interrupted()) {
        Thread.currentThread().interrupt() // Retain interrupted status.
        throw InterruptedIOException("interrupted")
    }

    if (hasDeadline && deadlineNanoTime - System.nanoTime() <= 0) {
        throw InterruptedIOException("deadline reached")
    }
}
从注释也可以看出来,该方法会检测 是否达到 deadline,如果达到了则抛出一个 中断异常。
@Throws(InterruptedIOException::class)
fun waitUntilNotified(monitor: Any) {
    try {
        val hasDeadline = hasDeadline()
        val timeoutNanos = timeoutNanos()

        if (!hasDeadline && timeoutNanos == 0L) {
            (monitor as Object).wait() // There is no timeout: wait forever.
            return
        }

        // Compute how long we'll wait.
        val start = System.nanoTime()
        val waitNanos = if (hasDeadline && timeoutNanos != 0L) {
            val deadlineNanos = deadlineNanoTime() - start
            minOf(timeoutNanos, deadlineNanos)
        } else if (hasDeadline) {
            deadlineNanoTime() - start
        } else {
            timeoutNanos
        }

        // Attempt to wait that long. This will break out early if the monitor is notified.
        var elapsedNanos = 0L
        if (waitNanos > 0L) {
            val waitMillis = waitNanos / 1000000L
            (monitor as Object).wait(waitMillis, (waitNanos - waitMillis * 1000000L).toInt())
            elapsedNanos = System.nanoTime() - start
        }

        // Throw if the timeout elapsed before the monitor was notified.
        if (elapsedNanos >= waitNanos) {
            throw InterruptedIOException("timeout")
        }
    } catch (e: InterruptedException) {
        Thread.currentThread().interrupt() // Retain interrupted status.
        throw InterruptedIOException("interrupted")
    }
}
该方法传入一个 Object,首先会调用 Objet.wait 阻塞,然后再调用 Object.notity 唤醒后开始检测超时,调用该方法开始 wait 时则视为一个任务的开始,当唤醒后会分别做 timeoutNanos 与 deadlineNanos 的检测。如果超时则抛出异常。
inline fun intersectWith(other: Timeout, block: () -> Unit) {
    val originalTimeout = this.timeoutNanos()
    this.timeout(minTimeout(other.timeoutNanos(), this.timeoutNanos()), TimeUnit.NANOSECONDS)

    if (this.hasDeadline()) {
        val originalDeadline = this.deadlineNanoTime()
        if (other.hasDeadline()) {
            this.deadlineNanoTime(Math.min(this.deadlineNanoTime(), other.deadlineNanoTime()))
        }
        try {
            block()
        } finally {
            this.timeout(originalTimeout, TimeUnit.NANOSECONDS)
            if (other.hasDeadline()) {
                this.deadlineNanoTime(originalDeadline)
            }
        }
    } else {
        if (other.hasDeadline()) {
            this.deadlineNanoTime(other.deadlineNanoTime())
        }
        try {
            block()
        } finally {
            this.timeout(originalTimeout, TimeUnit.NANOSECONDS)
            if (other.hasDeadline()) {
                this.clearDeadline()
            }
        }
    }
}
该方法传入另一个 Timeout,这里将计算两者的时间最短,然后赋值给自身,计算完成后调用传入的 Block 高阶函数 。
Timeout 这个类本身只提供时间的设置和时间判断的方法,具体实现由子类实现,我们可以看到其有两个子类,为异步超时与委托子类
委托子类 ForwordingTimeout
该类比较,就是直接对 Timeout 的装饰类:
open class ForwardingTimeout(
    @get:JvmName("delegate")
    @set:JvmSynthetic // So .java callers get the setter that returns this.
    var delegate: Timeout
) : Timeout() {

    // For backwards compatibility with Okio 1.x, this exists so it can return `ForwardingTimeout`.
    fun setDelegate(delegate: Timeout): ForwardingTimeout {
        this.delegate = delegate
        return this
    }

    override fun timeout(timeout: Long, unit: TimeUnit) = delegate.timeout(timeout, unit)

    override fun timeoutNanos() = delegate.timeoutNanos()

    override fun hasDeadline() = delegate.hasDeadline()

    override fun deadlineNanoTime() = delegate.deadlineNanoTime()

    override fun deadlineNanoTime(deadlineNanoTime: Long) = delegate.deadlineNanoTime(
        deadlineNanoTime)

    override fun clearTimeout() = delegate.clearTimeout()

    override fun clearDeadline() = delegate.clearDeadline()

    @Throws(IOException::class)
    override fun throwIfReached() = delegate.throwIfReached()
}
异步超时 AsyncTimeout
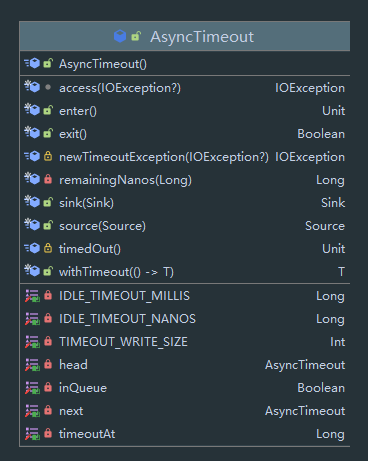
可以看到这个 AsyncTimeout 是一个链表,其中有 next 表示下一个节点,inQueue 表示是否在链表中,以及 head 表示头结点。
首先该方法具有 companion object 字段:
companion object {

    private const val TIMEOUT_WRITE_SIZE = 64 * 1024

    private val IDLE_TIMEOUT_MILLIS = TimeUnit.SECONDS.toMillis(60)
    private val IDLE_TIMEOUT_NANOS = TimeUnit.MILLISECONDS.toNanos(IDLE_TIMEOUT_MILLIS)

    private var head: AsyncTimeout? = null

    private fun scheduleTimeout(node: AsyncTimeout, timeoutNanos: Long, hasDeadline: Boolean) {

    }

    private fun cancelScheduledTimeout(node: AsyncTimeout): Boolean {

    }
    @Throws(InterruptedException::class)
    internal fun awaitTimeout(): AsyncTimeout? {

    }
  }
除了常量外有一个 head 为队列的头结点,还有 scheduleTimeout,cancelScheduledTimeout 与 awaitTimeout 方法,之后都会介绍。
接下来来看看加入链表和弹出链表的两个方法:
/** If scheduled, this is the time that the watchdog should time this out.  */
fun enter() {
    check(!inQueue) { "Unbalanced enter/exit" }
    val timeoutNanos = timeoutNanos()
    val hasDeadline = hasDeadline()
    if (timeoutNanos == 0L && !hasDeadline) {
        return // No timeout and no deadline? Don't bother with the queue.
    }
    inQueue = true
    scheduleTimeout(this, timeoutNanos, hasDeadline)
}


/** Returns true if the timeout occurred.  */
fun exit(): Boolean {
    if (!inQueue) return false
    inQueue = false
    return cancelScheduledTimeout(this)
}
可以看到,最终是调用 scheduleTimeout(this, timeoutNanos, hasDeadline) 开始进行超时检测,调用 cancelScheduledTimeout(this) 结束 。
到此先打住,我们需要先了解 AsyncTimeout 两种工作机制,首先是同步检测,在每个 sink 或 source 执行 write 或 read 结束后都会检测一下是否超时,如果超时则调用回调。除此之外 AsyncTimeout 还开启了一个 WatchDog 线程,不断检测是否有超时,如果发现超时也调用回调 。
接下来我们从 AsyncTimeout 的使用入手。
我们调用 AsyncTimeout 中的 sink 或 source 方法给流加上超时,这里以 sink 为例。
/**
   * Returns a new sink that delegates to [sink], using this to implement timeouts. This works
   * best if [timedOut] is overridden to interrupt [sink]'s current operation.
   */
fun sink(sink: Sink): Sink {
    // 返回委托类
    return object : Sink {
        override fun write(source: Buffer, byteCount: Long) {
            // 检查合法性
            checkOffsetAndCount(source.size, 0, byteCount)
            // 总共需要写入的字节数
            var remaining = byteCount
            // 只要还有剩余字节要写则不断循环
            while (remaining > 0L) {
                // 本次需要写入
                var toWrite = 0L
                // 源的 Segment 链表头结点
                var s = source.head!!
                // 确定本次要写入的字节,有几个规则
                // 不能小于 TIMEOUT_WRITE_SIZE (除非大于等于 remaining)
                // 需要整数个 Segment 的字节数
                while (toWrite < TIMEOUT_WRITE_SIZE) {
                    val segmentSize = s.limit - s.pos
                    toWrite += segmentSize.toLong()
                    if (toWrite >= remaining) {
                        toWrite = remaining
                        break
                    }
                    s = s.next!!
                }

                // 同步 Timeout 的核心方法
                withTimeout { sink.write(source, toWrite) }
                remaining -= toWrite
            }
        }
主要是 withTimeout { sink.write(source, toWrite) },该方法的作用是判断有无超时,如果没有则调用传入的高阶函数,同时还会调用 enter 方法,我们之后分析。
inline fun <T> withTimeout(block: () -> T): T {
    var throwOnTimeout = false
    // 加入 queue ,接受 WatchDog 的监督
    enter()
    try {
        // 调用传入的 block 并获取结果,这里结果会直接返回,可能没有
        val result = block()
        // 该方法表示执行完毕本次任务,如果超时则抛异常,在 finally 中判断
        throwOnTimeout = true
        return result
    } catch (e: IOException) {
        // 调用 exit() 方法退出,并通过返回值判断是否是超时,如果不是因为超时的直接抛出,否则用 TimeoutException 包装
        throw if (!exit()) e else `access$newTimeoutException`(e)
    } finally {
        val timedOut = exit()
        if (timedOut && throwOnTimeout) throw `access$newTimeoutException`(null)
    }
}
至此,我们找到了其中一种超时机制,也就是同步机制,在 write 中写入多个,并在其中进行分别判断。但其中有一个问题,如果在写入的过程中超时,则无法快速响应,因此 okio 引入了第二套机制,也就是 watchDog 机制,我们来到刚刚 enter 与 exit 方法:
  fun enter() {
      check(!inQueue) { "Unbalanced enter/exit" }
      val timeoutNanos = timeoutNanos()
      val hasDeadline = hasDeadline()
      if (timeoutNanos == 0L && !hasDeadline) {
          return // No timeout and no deadline? Don't bother with the queue.
      }
      inQueue = true
      scheduleTimeout(this, timeoutNanos, hasDeadline)
  }

/** Returns true if the timeout occurred.  */
fun exit(): Boolean {
    if (!inQueue) return false
    inQueue = false
    return cancelScheduledTimeout(this)
}
最终是来到 scheduleTimeout(this, timeoutNanos, hasDeadline) 与 cancelScheduledTimeout(this) 方法,接下来我们来分析:
private fun scheduleTimeout(node: AsyncTimeout, timeoutNanos: Long, hasDeadline: Boolean) {
    // 同步锁
    synchronized(AsyncTimeout::class.java) {
        // Start the watchdog thread and create the head node when the first timeout is scheduled.
        // 如果头结点为 空,则新建一个头结点,并启动 Watchdog 线程
        if (head == null) {
            head = AsyncTimeout()
            // 实例化新的 Watchdog 线程并启动
            Watchdog().start()
        }

        // 当前时间
        val now = System.nanoTime()
        // 计算需要 timeout 的时间,这里包括多种情况综合考虑
        if (timeoutNanos != 0L && hasDeadline) {
            // Compute the earliest event; either timeout or deadline. Because nanoTime can wrap
            // around, minOf() is undefined for absolute values, but meaningful for relative ones.
            node.timeoutAt = now + minOf(timeoutNanos, node.deadlineNanoTime() - now)
        } else if (timeoutNanos != 0L) {
            node.timeoutAt = now + timeoutNanos
        } else if (hasDeadline) {
            node.timeoutAt = node.deadlineNanoTime()
        } else {
            throw AssertionError()
        }

        // Insert the node in sorted order.
        // 将 node 添加到链表中,链表以时间排序,这里从开始找到对应位置后插入
        val remainingNanos = node.remainingNanos(now)
        var prev = head!!
        while (true) {
            if (prev.next == null || remainingNanos < prev.next!!.remainingNanos(now)) {
                node.next = prev.next
                prev.next = node
                if (prev === head) {
                    // 如果插入后作为第一个节点,则调用 notify() 唤醒 watchdog
                    // Wake up the watchdog when inserting at the front.
                    (AsyncTimeout::class.java as Object).notify()
                }
                break
            }
            prev = prev.next!!
        }
    }
}
接下来我们来看看 Watchdog :
private class Watchdog internal constructor() : Thread("Okio Watchdog") {
    init {
        isDaemon = true
    }

    override fun run() {
        while (true) {
            try {
                var timedOut: AsyncTimeout? = null
                // 同步锁
                synchronized(AsyncTimeout::class.java) {
                    // 该方法为阻塞的方法
                    timedOut = awaitTimeout()

                    // The queue is completely empty. Let this thread exit and let another watchdog thread
                    // get created on the next call to scheduleTimeout().
                    // 如果超时的节点为头结点,则置空
                    if (timedOut === head) {
                        head = null
                        return
                    }
                }

                // Close the timed out node, if one was found.
                // 超时了,调用 timedOut() 回调。
                timedOut?.timedOut()
            } catch (ignored: InterruptedException) {
            }
        }
    }
}
来看看 awaitTimeout() 方法:
/**
     * Removes and returns the node at the head of the list, waiting for it to time out if
     * necessary. This returns [head] if there was no node at the head of the list when starting,
     * and there continues to be no node after waiting [IDLE_TIMEOUT_NANOS]. It returns null if a
     * new node was inserted while waiting. Otherwise this returns the node being waited on that has
     * been removed.
     */
@Throws(InterruptedException::class)
internal fun awaitTimeout(): AsyncTimeout? {
    // Get the next eligible node.
    val node = head!!.next

    // The queue is empty. Wait until either something is enqueued or the idle timeout elapses.
    if (node == null) {
        val startNanos = System.nanoTime()
        (AsyncTimeout::class.java as Object).wait(IDLE_TIMEOUT_MILLIS)
        return if (head!!.next == null && System.nanoTime() - startNanos >= IDLE_TIMEOUT_NANOS) {
            head // The idle timeout elapsed.
        } else {
            null // The situation has changed.
        }
    }

    var waitNanos = node.remainingNanos(System.nanoTime())

    // The head of the queue hasn't timed out yet. Await that.
    if (waitNanos > 0) {
        // Waiting is made complicated by the fact that we work in nanoseconds,
        // but the API wants (millis, nanos) in two arguments.
        val waitMillis = waitNanos / 1000000L
        waitNanos -= waitMillis * 1000000L
        (AsyncTimeout::class.java as Object).wait(waitMillis, waitNanos.toInt())
        return null
    }

    // The head of the queue has timed out. Remove it.
    head!!.next = node.next
    node.next = null
    return node
}
感觉挺长,实际上就是将队列中头结点的超时时间计算出来,然后调用 (AsyncTimeout::class.java as Object).wait(waitMillis, waitNanos.toInt()) 挂起当前线程,挂起后判断该节点是否超时(是否还在做刚刚的任务),如果是的话则删除该节点并返回 。
还记得刚刚在添加节点后如果是第一个节点需要唤醒 watchdog 线程,这是因为 watchdog 会按照第一个节点的时间来挂起自身,如果添加了新的第一个节点,则需要唤醒,唤醒后 watchdog 判断第一个节点未超时,则会进入下次循环,并重新挂起。