Okhttp3 源码分析
Okhttp 可以说是安卓开发者必须要掌握的一个库,但是怎么用一回事,其源码也是很值得一看的,一来可以在用的时候更加胸有成竹,二来可以学习其打码的一些架构。
问题
掘金中有一篇博客中列出了一些在学习该库的时候要思考的问题,这里列出。
博客: 【建议收藏】2020年中高级Android大厂面试秘籍,为你保驾护航金三银四,直通大厂(Android高级篇-3) - 掘金 (juejin.cn)
- 为什么要在项目中使用这个库?
- 这个库有哪些用法?对应什么样的场景?
- 这个库的优缺点是什么,跟同类型库的比较
- 这个库的核心实现原理是什么?如果让你实现这个库的某些核心功能,你会考虑怎么去实现?
- 各个拦截器的作用
- 你从这个库中学到什么有价值的或者说可借鉴的设计思想?
- 手写拦截器
- Okhttp 针对网络层有哪些优化
- 网络请求缓存处理,okhttp 如何处理网络缓存
- HttpUrlConnection 和 Okhttp 的关系
- 自己去设计网络请求架构,应该怎么做?
- 从网络加载一个 10 M 的图片,有什么注意事项
- Http 怎么知道文件过大是否传输完毕的响应
- 谈谈你对 Websocket 的理解
- Websocket 和 socket 的区别
在学习后,希望能对这些问题做出不错的回答。
OkhttpClient
OkhttpClient 是一个发起请求客户端的抽象,内部持有许多东西,比如缓存,代理,连接池等 。
OkhttpClient 使用 创建者模式,因此我们直接来到 OkhttpClient.Builder 的成员变量:
class Builder constructor() {
    internal var dispatcher: Dispatcher = Dispatcher()
    internal var connectionPool: ConnectionPool = ConnectionPool()
    internal val interceptors: MutableList<Interceptor> = mutableListOf()
    internal val networkInterceptors: MutableList<Interceptor> = mutableListOf()
    internal var eventListenerFactory: EventListener.Factory = EventListener.NONE.asFactory()
    internal var retryOnConnectionFailure = true
    internal var authenticator: Authenticator = Authenticator.NONE
    internal var followRedirects = true
    internal var followSslRedirects = true
    internal var cookieJar: CookieJar = CookieJar.NO_COOKIES
    internal var cache: Cache? = null
    internal var dns: Dns = Dns.SYSTEM
    internal var proxy: Proxy? = null
    internal var proxySelector: ProxySelector? = null
    internal var proxyAuthenticator: Authenticator = Authenticator.NONE
    internal var socketFactory: SocketFactory = SocketFactory.getDefault()
    internal var sslSocketFactoryOrNull: SSLSocketFactory? = null
    internal var x509TrustManagerOrNull: X509TrustManager? = null
    internal var connectionSpecs: List<ConnectionSpec> = DEFAULT_CONNECTION_SPECS
    internal var protocols: List<Protocol> = DEFAULT_PROTOCOLS
    internal var hostnameVerifier: HostnameVerifier = OkHostnameVerifier
    internal var certificatePinner: CertificatePinner = CertificatePinner.DEFAULT
    internal var certificateChainCleaner: CertificateChainCleaner? = null
    internal var callTimeout = 0
    internal var connectTimeout = 10_000
    internal var readTimeout = 10_000
    internal var writeTimeout = 10_000
    internal var pingInterval = 0
    internal var minWebSocketMessageToCompress = RealWebSocket.DEFAULT_MINIMUM_DEFLATE_SIZE
    internal var routeDatabase: RouteDatabase? = null
    /*省略其他方法*/
}
可以看到有许多对象,这里我们不一一列举,很多对象基本上都能从名字看出用处,等到之后过程分析的时候会用到。
同步请求
同步请求的一般写法:
    val client = OkHttpClient()
    client.newCall(
        Request.Builder()
            .url("https://www.baidu.com")
            .get().build())
        .execute()
前面链式调用构造 Reuest 没有什么需要讲的,这里我们重点分析两个方法,newCall 与 execute
override fun newCall(request: Request): Call = RealCall(this, request, forWebSocket = false)
该方法会构造一个 RealCall 对象,该对象实现了 Call 接口,这里先来看看 Call 接口:
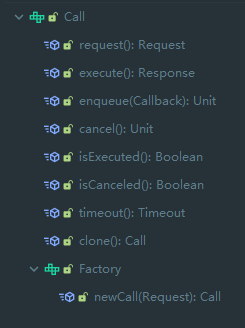
Call 接口是对一次请求的抽象,最终实现为 RealCall 。最终我们会调用 RealCall 的 execute 方法:
override fun execute(): Response {
    // 保证一个 call 只能被 executed 一次,这里使用 原子变量 来处理并发
    check(executed.compareAndSet(false, true)) { "Already Executed" }

    // 开始进行 timeout 操作
    timeout.enter()

    callStart()
    try {
        client.dispatcher.executed(this)
        return getResponseWithInterceptorChain()
    } finally {
        client.dispatcher.finished(this)
    }
}
这里 timeout 相关可以看 okio 的相关,这里不再说明。可以看到超时后最终会调研 cancel 方法 。
private val timeout = object : AsyncTimeout() {
    override fun timedOut() {
        cancel()
    }
}.apply {
    timeout(client.callTimeoutMillis.toLong(), MILLISECONDS)
}
可以看到首先调用 callStart 方法进行标记
private fun callStart() {
    this.callStackTrace = Platform.get().getStackTraceForCloseable("response.body().close()")
    eventListener.callStart(this)
}
该方法主要是进行 listener 的调用。
最后在 try 语句中会调用 client.dispatcher.executed(this) 方法,该方法利用 dispatcher 分发自己,最后调用 getResponseWithInterceptorChain(),先来看看该方法:
@Throws(IOException::class)
internal fun getResponseWithInterceptorChain(): Response {
    // Build a full stack of interceptors.
    // 拦截器列表
    val interceptors = mutableListOf<Interceptor>()
    interceptors += client.interceptors
    interceptors += RetryAndFollowUpInterceptor(client)
    interceptors += BridgeInterceptor(client.cookieJar)
    interceptors += CacheInterceptor(client.cache)
    interceptors += ConnectInterceptor
    if (!forWebSocket) {
        interceptors += client.networkInterceptors
    }
    interceptors += CallServerInterceptor(forWebSocket)

    // 构造拦截链
    val chain = RealInterceptorChain(
        call = this,
        interceptors = interceptors,
        index = 0,
        exchange = null,
        // 构造方法传入的 Request
        request = originalRequest,
        connectTimeoutMillis = client.connectTimeoutMillis,
        readTimeoutMillis = client.readTimeoutMillis,
        writeTimeoutMillis = client.writeTimeoutMillis
    )

    var calledNoMoreExchanges = false
    try {
        // 最终调用的方法
        val response = chain.proceed(originalRequest)
        if (isCanceled()) {
            response.closeQuietly()
            throw IOException("Canceled")
        }
        return response
    } catch (e: IOException) {
        calledNoMoreExchanges = true
        throw noMoreExchanges(e) as Throwable
    } finally {
        if (!calledNoMoreExchanges) {
            noMoreExchanges(null)
        }
    }
}
这里我们构造了一个 RealInterceptorChain 拦截链,并调用 chain.proceed 开始工作。
我们可以总结出发送一个请求,总共分两步
- 调用 dispatcher.executed 分派
- 调用 getResponseWithInterceptorChain 通过拦截链获取结果
关于 Dispatcher 与 InterceptorChain 之后在详细说明
异步请求
val client = OkHttpClient()
client.newCall(
    Request.Builder()
    .url("https://www.baidu.com")
    .get().build())
.enqueue(object: Callback{
    override fun onFailure(call: Call, e: IOException) {
        TODO("Not yet implemented")
    }

    override fun onResponse(call: Call, response: Response) {
        TODO("Not yet implemented")
    }
})
前面一致,主要是调用了 RealCall 的 enqueue 方法:
override fun enqueue(responseCallback: Callback) {
  check(executed.compareAndSet(false, true)) { "Already Executed" }

  callStart()
  client.dispatcher.enqueue(AsyncCall(responseCallback))
}
这里调用 dispatcher.enqueue ,并传入了一个 AsyncCall 对象,该对象为 RealCall 中的一个内部类,实现了 Runnable 接口:
以下是其 run 方法:
override fun run() {
    threadName("OkHttp ${redactedUrl()}") {
        var signalledCallback = false
        timeout.enter()
        try {
            // 获取结果
            val response = getResponseWithInterceptorChain()
            signalledCallback = true
            // 调用回调
            responseCallback.onResponse(this@RealCall, response)
        } catch (e: IOException) {
            if (signalledCallback) {
                // Do not signal the callback twice!
                Platform.get().log("Callback failure for ${toLoggableString()}", Platform.INFO, e)
            } else {
                responseCallback.onFailure(this@RealCall, e)
            }
        } catch (t: Throwable) {
            cancel()
            if (!signalledCallback) {
                val canceledException = IOException("canceled due to $t")
                canceledException.addSuppressed(t)
                responseCallback.onFailure(this@RealCall, canceledException)
            }
            throw t
        } finally {
            client.dispatcher.finished(this)
        }
    }
}
可以看到 run 中还是调用了 getResponseWithInterceptorChain() 方法获取结果。实际上, AsyncCall 还有一个 executeOn 方法,这里先不分析。
最终还是与同步操作一致,利用 dispatcher 分发,调用 getResponseWithInterceptorChain() 获取结果 。
Dispatcher 分派器
这里的 Dispatcher 实际上就是 Client 中的 Dispatcher,通过 Builder 中的代码可以看见其初始化:
internal var dispatcher: Dispatcher = Dispatcher()
来到该类
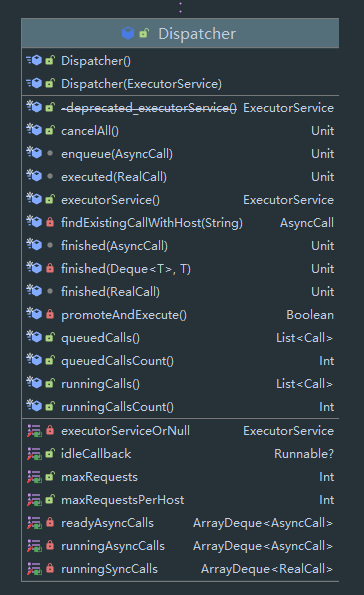
该类主要是维护了三个队列与一个 ExecutorService:
- readyAsyncCalls 准备好的 AsyncCall
- runningAsyncCalls 运行中的 AsyncCall
- runningSyncCalls 运行中的 SyncCall
关于 ExecutorService,来到其声明:
private var executorServiceOrNull: ExecutorService? = null

@get:Synchronized
@get:JvmName("executorService") val executorService: ExecutorService
get() {
    if (executorServiceOrNull == null) {
        executorServiceOrNull = ThreadPoolExecutor(0, Int.MAX_VALUE, 60, TimeUnit.SECONDS,
                                                   SynchronousQueue(), threadFactory("$okHttpName Dispatcher", false))
    }
    return executorServiceOrNull!!
}
可以看到实际上是一个直接握手策略的线程池(可以看我之前关于 ThreadPoolExecutor 的文章),该线程池无论如何都会创建新线程。
回到之前同步请求中调用了 Dispatcher 的 executed 方法:
@Synchronized internal fun executed(call: RealCall) {
    runningSyncCalls.add(call)
}
该方法就是直接将 Call 放入 runningSyncCalls 中,没啥特别。
来到异步请求中调用 Dispatcher 的 enqueue 方法:
internal fun enqueue(call: AsyncCall) {
    synchronized(this) {
        readyAsyncCalls.add(call)

        // Mutate the AsyncCall so that it shares the AtomicInteger of an existing running call to
        // the same host.
        // 寻找已经存在的同样 host 的请求,然后暂停已经存在的同样的请求
        if (!call.call.forWebSocket) {
            val existingCall = findExistingCallWithHost(call.host)
            if (existingCall != null) call.reuseCallsPerHostFrom(existingCall)
        }
    }
    // 最终方法
    promoteAndExecute()
}
放入队列后会调用 promoteAndExecute 方法:
/**
   * Promotes eligible calls from [readyAsyncCalls] to [runningAsyncCalls] and runs them on the
   * executor service. Must not be called with synchronization because executing calls can call
   * into user code.
   *
   * @return true if the dispatcher is currently running calls.
   */
private fun promoteAndExecute(): Boolean {
    this.assertThreadDoesntHoldLock()

    val executableCalls = mutableListOf<AsyncCall>()
    val isRunning: Boolean
    synchronized(this) {
        val i = readyAsyncCalls.iterator()
        while (i.hasNext()) {
            val asyncCall = i.next()

            if (runningAsyncCalls.size >= this.maxRequests) break // Max capacity.
            if (asyncCall.callsPerHost.get() >= this.maxRequestsPerHost) continue // Host max capacity.

            i.remove()
            asyncCall.callsPerHost.incrementAndGet()
            executableCalls.add(asyncCall)
            runningAsyncCalls.add(asyncCall)
        }
        isRunning = runningCallsCount() > 0
    }

    for (i in 0 until executableCalls.size) {
        val asyncCall = executableCalls[i]
        asyncCall.executeOn(executorService)
    }

    return isRunning
}
过程还是比较好理解的,首先调用 assertThreadDoesntHoldLock() 确保当前线程没有持有 this 锁,否则则直接抛异常,这里是为了让该锁不可重入,避免递归调用 (可能还有其他原因,这里不做过多分析)。
然后再使用 synchronized 获取 this 锁 。
分析需要执行的 AsyncCall 然后调用其 executeOn 方法,这里传入的 executorService 为刚刚分析过,采用直接握手,每次都会新建线程。
我们来到 executeOn 方法:
/**
     * Attempt to enqueue this async call on [executorService]. This will attempt to clean up
     * if the executor has been shut down by reporting the call as failed.
     */
fun executeOn(executorService: ExecutorService) {
    client.dispatcher.assertThreadDoesntHoldLock()

    var success = false
    try {
        executorService.execute(this)
        success = true
    } catch (e: RejectedExecutionException) {
        val ioException = InterruptedIOException("executor rejected")
        ioException.initCause(e)
        noMoreExchanges(ioException)
        responseCallback.onFailure(this@RealCall, ioException)
    } finally {
        if (!success) {
            client.dispatcher.finished(this) // This call is no longer running!
        }
    }
}
首先还是确保不能持有锁,然后进行一些判断并运行,最终回来到 executorService.execute(this) ,将 this 放进 线程池中,最终会开新线程执行 run 方法,run 方法之前已经分析过 。
InterceptorChain 拦截器
无论是同步调用与异步调用,调用 dispatcher 的时候都没有最终进行请求的发送,最终都会调用 getResponseWithInterceptorChain,我们再次来到该方法:
@Throws(IOException::class)
internal fun getResponseWithInterceptorChain(): Response {
    // Build a full stack of interceptors.
    // 拦截器列表
    val interceptors = mutableListOf<Interceptor>()
    interceptors += client.interceptors
    interceptors += RetryAndFollowUpInterceptor(client)
    interceptors += BridgeInterceptor(client.cookieJar)
    interceptors += CacheInterceptor(client.cache)
    interceptors += ConnectInterceptor
    if (!forWebSocket) {
        interceptors += client.networkInterceptors
    }
    interceptors += CallServerInterceptor(forWebSocket)

    // 构造拦截链
    val chain = RealInterceptorChain(
        call = this,
        interceptors = interceptors,
        index = 0,
        exchange = null,
        // 构造方法传入的 Request
        request = originalRequest,
        connectTimeoutMillis = client.connectTimeoutMillis,
        readTimeoutMillis = client.readTimeoutMillis,
        writeTimeoutMillis = client.writeTimeoutMillis
    )

    var calledNoMoreExchanges = false
    try {
        // 最终调用的方法
        val response = chain.proceed(originalRequest)
        if (isCanceled()) {
            response.closeQuietly()
            throw IOException("Canceled")
        }
        return response
    } catch (e: IOException) {
        calledNoMoreExchanges = true
        throw noMoreExchanges(e) as Throwable
    } finally {
        if (!calledNoMoreExchanges) {
            noMoreExchanges(null)
        }
    }
}
最终的方法为 chain.proceed(originalRequest),因此我们先来看看 RealInterceptorChain 类:
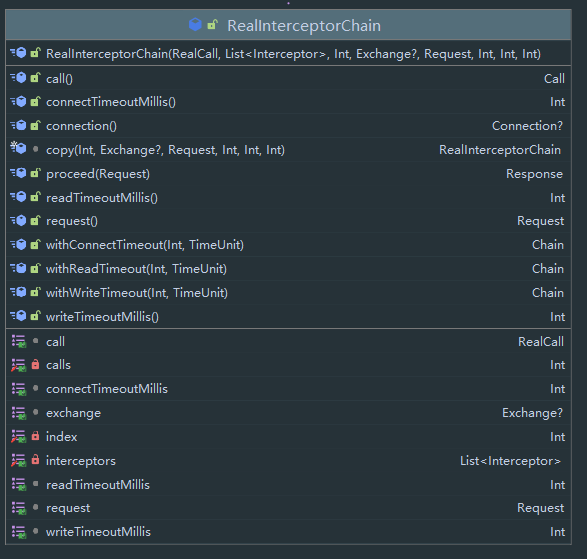
RealInterceptorChain 持有一个 List<Interceptor>,该对象就是拦截器链,这里我们先来看看 Interceptor 的 接口:
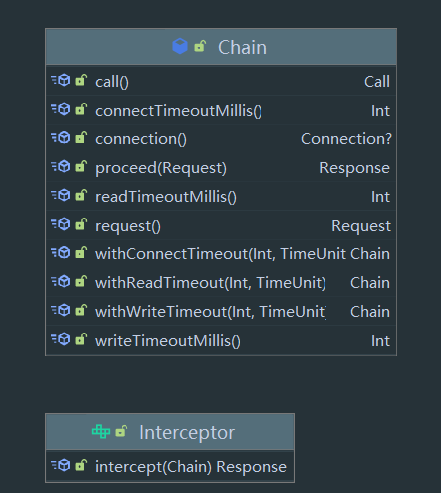
该接口只有一个 intercept 方法,该方法传入一个 Chain ,并返回一个 Response,而 Chain 是一个实体类,封装了该请求的一些对象,比如 Connection,Call 等, 实际上 我们的 RealInterceptorChain 也是实现了 Chain 接口,具体细节之后分析会讲到。
来到 RealInterceptorChain.proceed 方法:
@Throws(IOException::class)
override fun proceed(request: Request): Response {
    check(index < interceptors.size)

    calls++

    if (exchange != null) {
        check(exchange.finder.sameHostAndPort(request.url)) {
            "network interceptor ${interceptors[index - 1]} must retain the same host and port"
        }
        check(calls == 1) {
            "network interceptor ${interceptors[index - 1]} must call proceed() exactly once"
        }
    }

    // Call the next interceptor in the chain.
    // 获取下一个 Chain
    val next = copy(index = index + 1, request = request)
    val interceptor = interceptors[index]

    @Suppress("USELESS_ELVIS")
    // 调用 interceptor.intercept
    val response = interceptor.intercept(next) ?: throw NullPointerException(
        "interceptor $interceptor returned null")

    if (exchange != null) {
        check(index + 1 >= interceptors.size || next.calls == 1) {
            "network interceptor $interceptor must call proceed() exactly once"
        }
    }

    check(response.body != null) { "interceptor $interceptor returned a response with no body" }

    return response
}
这里没有使用循环,而是直接复制一个 新的 Chain 对象,并把 index + 1,然后直接调用 interceptor.intercept(next) 方法,也就是说我们需要在 interceptor 里手动调用下一个,否则拦截链链会停止,这里就提供了一种灵活的方法,当我们想要在中途退出时,不执行下一个 interceptor 的方法即可。同时,每次传入 interceptor 的 Chain 对象都是不同的对象,只不过拥有同样的 request ,同时因为每次执行下一个 interceptor 的代码都在其自身,因此前面的 interceptor 可以 catch 到之后 interceptor 抛出的所有 异常。
让我们回到最初的 getResponseWithInterceptorChain 方法,可以看到默认拦截器链中加入了如下拦截器(假设不使用 websocket):
client.interceptors
RetryAndFollowUpInterceptor(client)
BridgeInterceptor(client.cookieJar)
CacheInterceptor(client.cache)
ConnectInterceptor
CallServerInterceptor(forWebSocket)
我们一个一个看,
- client.interceptors 这是我们自定义的拦截器,储存在 client 中,默认为空
- RetryAndFollowUpInterceptor : 当请求出现异常,重新尝试,并根据需要重定向(例如状态码 301 等情况),如果重试时发现该请求已经被关闭,则抛出 IO 异常
- BridgeInterceptor:应用代码与网络代码的桥梁,根据 Request 构造 真正的 Request(实际上就是检测一些必备的请求头等),同时将结果封装为 Respouse 并返回。如果我们有些 cookie 等操作,也是在这里进行操作
- CacheInterceptor:顾名思义,将 Request 放入缓存,和从缓存中提取 Response
- ConnectInterceptor:打开一个 Connect,只是选择并没有真正建立连接,连接池的服用也是基于此实现
- CallServerInterceptor:最后一个 Interceptor ,最终与 server 建立连接并进行请求与响应
RetryAndFollowUpinterceptor
该 Interceptor 主要是进行异常重试(包括处理重定向),先来看看其 intercept 方法:
@Throws(IOException::class)
override fun intercept(chain: Interceptor.Chain): Response {
    val realChain = chain as RealInterceptorChain
    var request = chain.request
    val call = realChain.call
    var followUpCount = 0
    var priorResponse: Response? = null
    var newExchangeFinder = true
    // 储存历次的错误尝试
    var recoveredFailures = listOf<IOException>()
    // 死循环
    while (true) {
        // 准备开始进行一个请求,会寻找 Exchange 对象,之后再说明
        call.enterNetworkInterceptorExchange(request, newExchangeFinder)

        var response: Response
        var closeActiveExchange = true
        try {
            if (call.isCanceled()) {
                throw IOException("Canceled")
            }

            try {
                // 调用拦截链下一个拦截器
                response = realChain.proceed(request)
                newExchangeFinder = true
            } catch (e: RouteException) {
                // The attempt to connect via a route failed. The request will not have been sent.
                // 捕获到路由异常,开始进行重试
                // recover 方法判断是否需要重试
                if (!recover(e.lastConnectException, call, request, requestSendStarted = false)) {
                    throw e.firstConnectException.withSuppressed(recoveredFailures)
                } else {
                    recoveredFailures += e.firstConnectException
                }
                newExchangeFinder = false
                continue
            } catch (e: IOException) {
                // 试图与服务器通讯失败,但请求可能已经发送
                // recover 方法判断是否需要重试
                // An attempt to communicate with a server failed. The request may have been sent.
                if (!recover(e, call, request, requestSendStarted = e !is ConnectionShutdownException)) {
                    throw e.withSuppressed(recoveredFailures)
                } else {
                    recoveredFailures += e
                }
                newExchangeFinder = false
                continue
            }

            // Attach the prior response if it exists. Such responses never have a body.
            if (priorResponse != null) {
                response = response.newBuilder()
                .priorResponse(priorResponse.newBuilder()
                               .body(null)
                               .build())
                .build()
            }

            val exchange = call.interceptorScopedExchange
            // 调用 followUpRequest 方法获取重定向后的请求
            val followUp = followUpRequest(response, exchange)

            if (followUp == null) {
                if (exchange != null && exchange.isDuplex) {
                    call.timeoutEarlyExit()
                }
                closeActiveExchange = false
                return response
            }

            val followUpBody = followUp.body
            if (followUpBody != null && followUpBody.isOneShot()) {
                closeActiveExchange = false
                return response
            }

            response.body?.closeQuietly()

            // 重试次数过多 ,MAX_FOLLOW_UPS 为 20,为一个经验值
            if (++followUpCount > MAX_FOLLOW_UPS) {
                throw ProtocolException("Too many follow-up requests: $followUpCount")
            }

            request = followUp
            priorResponse = response
        } finally {
            // 通知 call 拦截链执行完毕
            call.exitNetworkInterceptorExchange(closeActiveExchange)
        }
    }
}
除去 exchange 的一些操作,本质上是一个循环,循环中调用下一个拦截器,并在捕获异常后调用 recover 方法判断该次请求是否需要重试,这里来看看 recover 方法:
/**
   * Report and attempt to recover from a failure to communicate with a server. Returns true if
   * `e` is recoverable, or false if the failure is permanent. Requests with a body can only
   * be recovered if the body is buffered or if the failure occurred before the request has been
   * sent.
   */
private fun recover(
    e: IOException,
    call: RealCall,
    userRequest: Request,
    requestSendStarted: Boolean
): Boolean {
    // The application layer has forbidden retries.
    // client 标记是否需要重试
    if (!client.retryOnConnectionFailure) return false

    // We can't send the request body again.
    // 请求已经发送了,只是其他原因抛出异常
    if (requestSendStarted && requestIsOneShot(e, userRequest)) return false

    // This exception is fatal.
    // 致命的异常
    if (!isRecoverable(e, requestSendStarted)) return false

    // No more routes to attempt.
    // 没有新路由
    if (!call.retryAfterFailure()) return false

    // For failure recovery, use the same route selector with a new connection.
    // 对于失败的恢复,会使用相同的路由选择器,新的连接
    return true
}
同时之前还调用了 followUpRequest 方法获取一个重定向连接,如果没有重定向则返回 null 。这里不给出,主要是各种判断,包括 client 是否允许重定向的标记,以及返回值等。
BridgeInterceptor
这里主要进行 请求的一些参数的补充以及 cookie 的相关操作,同时 gzip 的处理也在于此,来到该方法:
@Throws(IOException::class)
override fun intercept(chain: Interceptor.Chain): Response {
    val userRequest = chain.request()
    val requestBuilder = userRequest.newBuilder()

    val body = userRequest.body
    if (body != null) {
        val contentType = body.contentType()
        if (contentType != null) {
            requestBuilder.header("Content-Type", contentType.toString())
        }

        val contentLength = body.contentLength()
        if (contentLength != -1L) {
            requestBuilder.header("Content-Length", contentLength.toString())
            requestBuilder.removeHeader("Transfer-Encoding")
        } else {
            requestBuilder.header("Transfer-Encoding", "chunked")
            requestBuilder.removeHeader("Content-Length")
        }
    }

    if (userRequest.header("Host") == null) {
        requestBuilder.header("Host", userRequest.url.toHostHeader())
    }

    if (userRequest.header("Connection") == null) {
        requestBuilder.header("Connection", "Keep-Alive")
    }

    // If we add an "Accept-Encoding: gzip" header field we're responsible for also decompressing
    // the transfer stream.
    var transparentGzip = false
    if (userRequest.header("Accept-Encoding") == null && userRequest.header("Range") == null) {
        transparentGzip = true
        requestBuilder.header("Accept-Encoding", "gzip")
    }

    val cookies = cookieJar.loadForRequest(userRequest.url)
    if (cookies.isNotEmpty()) {
        requestBuilder.header("Cookie", cookieHeader(cookies))
    }

    if (userRequest.header("User-Agent") == null) {
        requestBuilder.header("User-Agent", userAgent)
    }

    val networkResponse = chain.proceed(requestBuilder.build())

    cookieJar.receiveHeaders(userRequest.url, networkResponse.headers)

    val responseBuilder = networkResponse.newBuilder()
    .request(userRequest)

    if (transparentGzip &&
        "gzip".equals(networkResponse.header("Content-Encoding"), ignoreCase = true) &&
        networkResponse.promisesBody()) {
        val responseBody = networkResponse.body
        if (responseBody != null) {
            val gzipSource = GzipSource(responseBody.source())
            val strippedHeaders = networkResponse.headers.newBuilder()
            .removeAll("Content-Encoding")
            .removeAll("Content-Length")
            .build()
            responseBuilder.headers(strippedHeaders)
            val contentType = networkResponse.header("Content-Type")
            responseBuilder.body(RealResponseBody(contentType, -1L, gzipSource.buffer()))
        }
    }

    return responseBuilder.build()
}
CacheInterceptor
@Throws(IOException::class)
override fun intercept(chain: Interceptor.Chain): Response {
    val call = chain.call()
    val cacheCandidate = cache?.get(chain.request())

    val now = System.currentTimeMillis()

    val strategy = CacheStrategy.Factory(now, chain.request(), cacheCandidate).compute()
    val networkRequest = strategy.networkRequest
    val cacheResponse = strategy.cacheResponse

    cache?.trackResponse(strategy)
    val listener = (call as? RealCall)?.eventListener ?: EventListener.NONE

    if (cacheCandidate != null && cacheResponse == null) {
        // The cache candidate wasn't applicable. Close it.
        cacheCandidate.body?.closeQuietly()
    }

    // If we're forbidden from using the network and the cache is insufficient, fail.
    if (networkRequest == null && cacheResponse == null) {
        return Response.Builder()
        .request(chain.request())
        .protocol(Protocol.HTTP_1_1)
        .code(HTTP_GATEWAY_TIMEOUT)
        .message("Unsatisfiable Request (only-if-cached)")
        .body(EMPTY_RESPONSE)
        .sentRequestAtMillis(-1L)
        .receivedResponseAtMillis(System.currentTimeMillis())
        .build().also {
            listener.satisfactionFailure(call, it)
        }
    }

    // If we don't need the network, we're done.
    if (networkRequest == null) {
        return cacheResponse!!.newBuilder()
        .cacheResponse(stripBody(cacheResponse))
        .build().also {
            listener.cacheHit(call, it)
        }
    }

    if (cacheResponse != null) {
        listener.cacheConditionalHit(call, cacheResponse)
    } else if (cache != null) {
        listener.cacheMiss(call)
    }

    var networkResponse: Response? = null
    try {
        networkResponse = chain.proceed(networkRequest)
    } finally {
        // If we're crashing on I/O or otherwise, don't leak the cache body.
        if (networkResponse == null && cacheCandidate != null) {
            cacheCandidate.body?.closeQuietly()
        }
    }

    // If we have a cache response too, then we're doing a conditional get.
    if (cacheResponse != null) {
        if (networkResponse?.code == HTTP_NOT_MODIFIED) {
            val response = cacheResponse.newBuilder()
            .headers(combine(cacheResponse.headers, networkResponse.headers))
            .sentRequestAtMillis(networkResponse.sentRequestAtMillis)
            .receivedResponseAtMillis(networkResponse.receivedResponseAtMillis)
            .cacheResponse(stripBody(cacheResponse))
            .networkResponse(stripBody(networkResponse))
            .build()

            networkResponse.body!!.close()

            // Update the cache after combining headers but before stripping the
            // Content-Encoding header (as performed by initContentStream()).
            cache!!.trackConditionalCacheHit()
            cache.update(cacheResponse, response)
            return response.also {
                listener.cacheHit(call, it)
            }
        } else {
            cacheResponse.body?.closeQuietly()
        }
    }

    val response = networkResponse!!.newBuilder()
    .cacheResponse(stripBody(cacheResponse))
    .networkResponse(stripBody(networkResponse))
    .build()

    if (cache != null) {
        if (response.promisesBody() && CacheStrategy.isCacheable(response, networkRequest)) {
            // Offer this request to the cache.
            val cacheRequest = cache.put(response)
            return cacheWritingResponse(cacheRequest, response).also {
                if (cacheResponse != null) {
                    // This will log a conditional cache miss only.
                    listener.cacheMiss(call)
                }
            }
        }

        if (HttpMethod.invalidatesCache(networkRequest.method)) {
            try {
                cache.remove(networkRequest)
            } catch (_: IOException) {
                // The cache cannot be written.
            }
        }
    }

    return response
}
暂时先直接贴代码,之后会更新详解
ConnectInterceptor
/**
 * Opens a connection to the target server and proceeds to the next interceptor. The network might
 * be used for the returned response, or to validate a cached response with a conditional GET.
 */
object ConnectInterceptor : Interceptor {
    @Throws(IOException::class)
    override fun intercept(chain: Interceptor.Chain): Response {
        val realChain = chain as RealInterceptorChain
        val exchange = realChain.call.initExchange(chain)
        val connectedChain = realChain.copy(exchange = exchange)
        return connectedChain.proceed(realChain.request)
    }
}
首先该类是一个单例模式,然后核心在于 val exchange = realChain.call.initExchange(chain) 获取一个 exchange 对象,该对象是 okhttp 对连接的封装,这里暂时先不分析,然后直接来到下一个拦截链。
在 initExchange 中,我们将会从连接池中选择一个连接,不过具体过程在下一个栏目会介绍。
CallServerInterceptor
@Throws(IOException::class)
override fun intercept(chain: Interceptor.Chain): Response {
    val realChain = chain as RealInterceptorChain
    val exchange = realChain.exchange!!
    val request = realChain.request
    val requestBody = request.body
    val sentRequestMillis = System.currentTimeMillis()

    exchange.writeRequestHeaders(request)

    var invokeStartEvent = true
    var responseBuilder: Response.Builder? = null
    if (HttpMethod.permitsRequestBody(request.method) && requestBody != null) {
        // If there's a "Expect: 100-continue" header on the request, wait for a "HTTP/1.1 100
        // Continue" response before transmitting the request body. If we don't get that, return
        // what we did get (such as a 4xx response) without ever transmitting the request body.
        if ("100-continue".equals(request.header("Expect"), ignoreCase = true)) {
            exchange.flushRequest()
            responseBuilder = exchange.readResponseHeaders(expectContinue = true)
            exchange.responseHeadersStart()
            invokeStartEvent = false
        }
        if (responseBuilder == null) {
            if (requestBody.isDuplex()) {
                // Prepare a duplex body so that the application can send a request body later.
                exchange.flushRequest()
                val bufferedRequestBody = exchange.createRequestBody(request, true).buffer()
                requestBody.writeTo(bufferedRequestBody)
            } else {
                // Write the request body if the "Expect: 100-continue" expectation was met.
                val bufferedRequestBody = exchange.createRequestBody(request, false).buffer()
                requestBody.writeTo(bufferedRequestBody)
                bufferedRequestBody.close()
            }
        } else {
            exchange.noRequestBody()
            if (!exchange.connection.isMultiplexed) {
                // If the "Expect: 100-continue" expectation wasn't met, prevent the HTTP/1 connection
                // from being reused. Otherwise we're still obligated to transmit the request body to
                // leave the connection in a consistent state.
                exchange.noNewExchangesOnConnection()
            }
        }
    } else {
        exchange.noRequestBody()
    }

    if (requestBody == null || !requestBody.isDuplex()) {
        exchange.finishRequest()
    }
    if (responseBuilder == null) {
        responseBuilder = exchange.readResponseHeaders(expectContinue = false)!!
        if (invokeStartEvent) {
            exchange.responseHeadersStart()
            invokeStartEvent = false
        }
    }
    var response = responseBuilder
    .request(request)
    .handshake(exchange.connection.handshake())
    .sentRequestAtMillis(sentRequestMillis)
    .receivedResponseAtMillis(System.currentTimeMillis())
    .build()
    var code = response.code
    if (code == 100) {
        // Server sent a 100-continue even though we did not request one. Try again to read the actual
        // response status.
        responseBuilder = exchange.readResponseHeaders(expectContinue = false)!!
        if (invokeStartEvent) {
            exchange.responseHeadersStart()
        }
        response = responseBuilder
        .request(request)
        .handshake(exchange.connection.handshake())
        .sentRequestAtMillis(sentRequestMillis)
        .receivedResponseAtMillis(System.currentTimeMillis())
        .build()
        code = response.code
    }

    exchange.responseHeadersEnd(response)

    response = if (forWebSocket && code == 101) {
        // Connection is upgrading, but we need to ensure interceptors see a non-null response body.
        response.newBuilder()
        .body(EMPTY_RESPONSE)
        .build()
    } else {
        response.newBuilder()
        .body(exchange.openResponseBody(response))
        .build()
    }
    if ("close".equals(response.request.header("Connection"), ignoreCase = true) ||
        "close".equals(response.header("Connection"), ignoreCase = true)) {
        exchange.noNewExchangesOnConnection()
    }
    if ((code == 204 || code == 205) && response.body?.contentLength() ?: -1L > 0L) {
        throw ProtocolException(
            "HTTP $code had non-zero Content-Length: ${response.body?.contentLength()}")
    }
    return response
}
tcp 连接已经建立,这里进行 http 请求,获取相应并返回。这里代码也比较好理解,直接给出,这里主要调用 exchange 的相关方法 。
Exchange
Exchange 是数据交换的抽象,以下是官方的注释:
/**
 * Transmits a single HTTP request and a response pair. This layers connection management and events
 * on [ExchangeCodec], which handles the actual I/O.
 */
用于发送和接收一组 Http 请求和响应。在 ExchangeCodec 中分层的管理连接与事件,并处理实际的 I/O 操作。
这里给出该类的两个方法:
// Exchange
@Throws(IOException::class)
fun writeRequestHeaders(request: Request) {
    try {
        eventListener.requestHeadersStart(call)
        codec.writeRequestHeaders(request)
        eventListener.requestHeadersEnd(call, request)
    } catch (e: IOException) {
        eventListener.requestFailed(call, e)
        trackFailure(e)
        throw e
    }
}

@Throws(IOException::class)
fun createRequestBody(request: Request, duplex: Boolean): Sink {
    this.isDuplex = duplex
    val contentLength = request.body!!.contentLength()
    eventListener.requestBodyStart(call)
    val rawRequestBody = codec.createRequestBody(request, contentLength)
    return RequestBodySink(rawRequestBody, contentLength)
}
可以看到许多方法最终都是调用 codec 实现,并在前后进行一些事件监听器的调用 。
让我们回到最初的起点,来到 ConnectInterceptor 的 intercept 方法:
@Throws(IOException::class)
override fun intercept(chain: Interceptor.Chain): Response {
    val realChain = chain as RealInterceptorChain
    val exchange = realChain.call.initExchange(chain)
    val connectedChain = realChain.copy(exchange = exchange)
    return connectedChain.proceed(realChain.request)
}
可以看到 exchange 在这里初始化,调用 call.initExchange 方法:
internal fun initExchange(chain: RealInterceptorChain): Exchange {
    synchronized(this) {
        check(expectMoreExchanges) { "released" }
        check(!responseBodyOpen)
        check(!requestBodyOpen)
    }

    val exchangeFinder = this.exchangeFinder!! // 获取 exchangeFinder
    val codec = exchangeFinder.find(client, chain) // find
    val result = Exchange(this, eventListener, exchangeFinder, codec) // 实例化
    this.interceptorScopedExchange = result
    this.exchange = result
    synchronized(this) {
        this.requestBodyOpen = true
        this.responseBodyOpen = true
    }

    if (canceled) throw IOException("Canceled")
    return result
}
可以看到调用 this.exchangeFinder 的 find 方法获取了一个 ExchangeCodec 对象,这个 exchangeFinder 在 enterNetworkInterceptorExchange 方法中初始化:
fun enterNetworkInterceptorExchange(request: Request, newExchangeFinder: Boolean) {
    check(interceptorScopedExchange == null)

    synchronized(this) {
        check(!responseBodyOpen) {
            "cannot make a new request because the previous response is still open: " +
            "please call response.close()"
        }
        check(!requestBodyOpen)
    }

    if (newExchangeFinder) {
        this.exchangeFinder = ExchangeFinder( // 初始化
            connectionPool,
            createAddress(request.url),
            this,
            eventListener
        )
    }
}
而 enterNetworkInterceptorExchange 方法在 RetryAndFollowUpinterceptor 中调用 。同时,这里传入了一个 connectionPool,该 Pool 在 OkhttpClient 中储存,也就是说 exchange 的初始化过程如下:
- RetryAndFollowUpinterceptor 调用 call.enterNetworkInterceptorExchange 方法实例化一个 ExchangeFinder 对象
- ConnectionIInterceptor 调用 call.initExchange 方法,调用 ExchangeFinder.find 方法找到一个 ExchangeCodec 对象,进而构造一个 Exchange 对象
接下来看看 ExchangeFinder.find 方法:
fun find(
    client: OkHttpClient,
    chain: RealInterceptorChain
): ExchangeCodec {
    try {
        val resultConnection = findHealthyConnection(
            connectTimeout = chain.connectTimeoutMillis,
            readTimeout = chain.readTimeoutMillis,
            writeTimeout = chain.writeTimeoutMillis,
            pingIntervalMillis = client.pingIntervalMillis,
            connectionRetryEnabled = client.retryOnConnectionFailure,
            doExtensiveHealthChecks = chain.request.method != "GET"
        )
        return resultConnection.newCodec(client, chain)
    } catch (e: RouteException) {
        trackFailure(e.lastConnectException)
        throw e
    } catch (e: IOException) {
        trackFailure(e)
        throw RouteException(e)
    }
}
这里调用 findHealthyConnection 方法在 ConnectionPool 中找到一个健康的连接,并创建 Codec 对象,这里 findHealthyConnection 方法较为复杂,这里不贴代码,给出官方注释:
/**
 * Attempts to find the connections for an exchange and any retries that follow. This uses the
 * following strategies:
 *
 *  1. If the current call already has a connection that can satisfy the request it is used. Using
 *     the same connection for an initial exchange and its follow-ups may improve locality.
 *
 *  2. If there is a connection in the pool that can satisfy the request it is used. Note that it is
 *     possible for shared exchanges to make requests to different host names! See
 *     [RealConnection.isEligible] for details.
 *
 *  3. If there's no existing connection, make a list of routes (which may require blocking DNS
 *     lookups) and attempt a new connection them. When failures occur, retries iterate the list of
 *     available routes.
 *
 * If the pool gains an eligible connection while DNS, TCP, or TLS work is in flight, this finder
 * will prefer pooled connections. Only pooled HTTP/2 connections are used for such de-duplication.
 *
 * It is possible to cancel the finding process.
 *
 * Instances of this class are not thread-safe. Each instance is thread-confined to the thread
 * executing [call].
 */
这里给出翻译:
/*
为了寻找一个 connections 来构造 Exchange 对象并且之后可能进行的重试操作,我们使用以下策略:
1. 如果当前 Call 对象已经有可以满足请求的连接,则使用它。对初始交换及其后续操作使用相同的连接可能会提高效率。
2. 如果池中存在可以满足请求的连接,则使用该连接。请注意,共享 Exchange 可以向不同的主机名发出请求!有关详细信息,请参阅 [RealConnection.isEligible]。
3. 如果不存在连接,则创建一个路由表(可能需要阻止 DNS 查找),并尝试建立新的连接,如果失败,则重新创建路由表

如果在 DNS 、 TCP 或 TLS 工作时池获得一个合格的连接,则优先使用池连接。只此类重复数据删除仅使用池化 HTTP/2 连接。

这个实例的所有方法都不是线程安全的
*/
ConnectionPool
ConnectionPool ,就是连接池
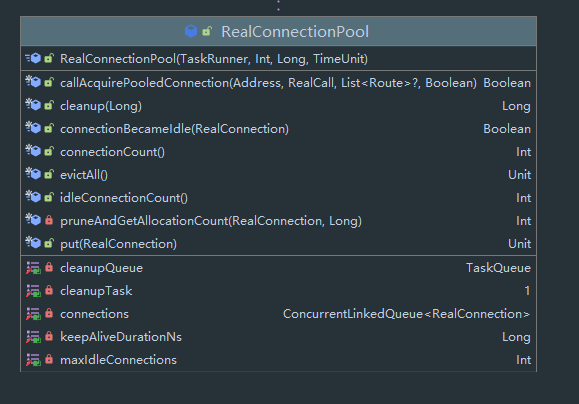
可以看到这里链接是使用 ConcurrentLinkedQueue 来进行存放,来看几个方法:
// RealConnectionPool # put
fun put(connection: RealConnection) {
    connection.assertThreadHoldsLock()

    connections.add(connection) // 添加连接
    cleanupQueue.schedule(cleanupTask) // 添加下次清理任务
}
/**
   * Attempts to acquire a recycled connection to [address] for [call]. Returns true if a connection
   * was acquired.
   *
   * If [routes] is non-null these are the resolved routes (ie. IP addresses) for the connection.
   * This is used to coalesce related domains to the same HTTP/2 connection, such as `square.com`
   * and `square.ca`.
   */
fun callAcquirePooledConnection(
    address: Address,
    call: RealCall,
    routes: List<Route>?,
    requireMultiplexed: Boolean
): Boolean {
    for (connection in connections) { // 遍历连接池
        synchronized(connection) { // 对连接上锁
            // 是否多路复用
            if (requireMultiplexed && !connection.isMultiplexed) return@synchronized
            // 该连接能否用于该 地址 与 路由
            if (!connection.isEligible(address, routes)) return@synchronized
            // 找到链接
            call.acquireConnectionNoEvents(connection)
            return true
        }
    }
    return false
}
连接复用过程
Address
Address 是一个实体类,以下是类图:
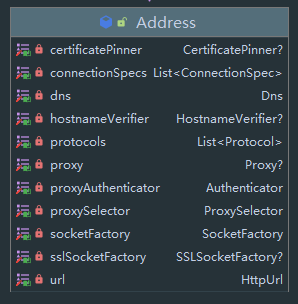
官方注释:
/**
 * A specification for a connection to an origin server. For simple connections, this is the
 * server's hostname and port. If an explicit proxy is requested (or [no proxy][Proxy.NO_PROXY] is explicitly requested),
 * this also includes that proxy information. For secure connections the address also includes the SSL socket factory,
 * hostname verifier, and certificate pinner.
 *
 * HTTP requests that share the same [Address] may also share the same [Connection].
 */

/**
 * 一个连接到源服务器的规范。 对于普通的连接, 这是服务器的 hostname 与 port 。如果显式指定所用代理(或显式指定使用 [无代理][Proxy.NO_PROXY]),
 * 则该类同时包含代理信息。对于加密请求,则该类包含 SSL socket Factory, hostname verifier 与 certificate pinner 。
 *
 * HTTP 请求如果共享同一个 Address 对象,则同样会共享同一个 Connection
 */
Router
如果是 Address 代表一个请求发起前的一些预备信息,则 Router 则代表一条具体的路径。
感性的认识:在 Address 中可能储存了 DNS 服务器的 套接字,以及一个代理配置(包括代理的形式与代理服务器的 套接字),则该 Address 在最终发送请求时可能会有多种可能的路径,例如 DNS 解析到不同的 IP,Proxy 服务器也可能返回多个 IP 供客户端选择,而一个 Router 就代表其中一条具体的路径。
类图:
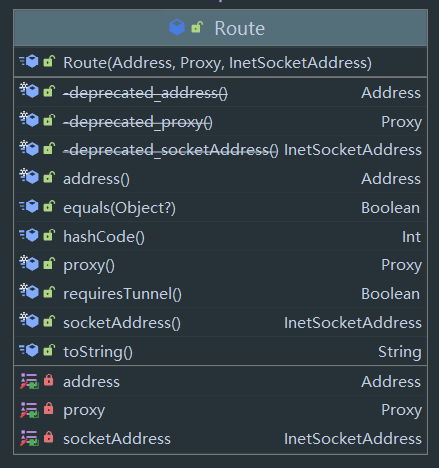
可以看到一个 Router 持有一个 Address 对象,一个具体的代理 Proxy,与最终的连接套接字 InetSocketAddress 。
还是来看看官方注释:
/**
 * The concrete route used by a connection to reach an abstract origin server. When creating a
 * connection the client has many options:
 *
 *  * **HTTP proxy:** a proxy server may be explicitly configured for the client.
 * Otherwise the [proxy selector][java.net.ProxySelector] is used. It may return
 * multiple proxies to attempt.
 *  * **IP address:** whether connecting directly to an origin server or a proxy,
 * opening a socket requires an IP address. The DNS server may return multiple IP addresses
 * to attempt.
 *
 * Each route is a specific selection of these options.
 */

/**
 * Router 是 一条到达抽象源服务器的具体路线。创建一条连接时,client 有许多选项:
 *
 * HTTP proxy:你可以显示指定一种代理配置(包括显示规定不使用代理)。否则则会使用 java.net.ProxySelector 来选择一个代理
 * IP Address:无论是直接连接到源服务器还是使用代理,打开一个 Sokcet 都需要一个 Ip 地址。同时 DNS 服务器也可能返回多个 Ip 地址供客户端尝试
 *
 * 每个 Router 都是这些选项的一种特定选择
 */
Connection
这是一个连接的抽象,其实现为 RealConnection,RealConenction 有许多成员变量:
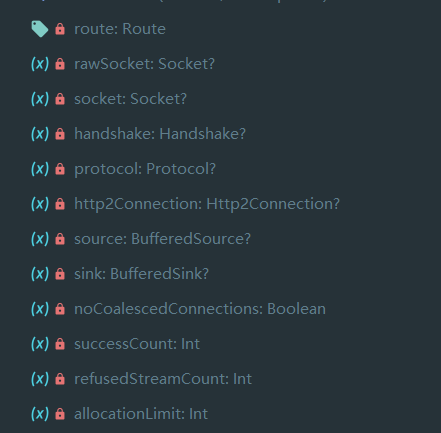
可以看到有 router,socket 等对象,以及 sink 与 source 的流对象。除此之外,还有 handshake 握手信息与 protocol 协议信息等。
值得注意的是,这里持有了一个 Http2Connection ,实际上如果使用 Http/2 协议的话,这里是采用委托的方式,将具体需求委托到 Http2Connection 中。
以下是官方注释:
/**
 * A connection to a remote web server capable of carrying 1 or more concurrent streams.
 *
 * A connection's lifecycle has two phases.
 *
 *  1. While it's connecting, the connection is owned by a single call using single thread. In this
 *     phase the connection is not shared and no locking is necessary.
 *
 *  2. Once connected, a connection is shared to a connection pool. In this phase accesses to the
 *     connection's state must be guarded by holding a lock on the connection.
 */

/**
 * 到一个远程服务器的连接,携带一个或多个并发流
 *
 * 一个连接有两个阶段的生命周期
 *
 * 1. 正在连接时,这个连接只属于一个 call,在这个阶段这个连接无法共享,也无需加锁
 *
 * 2. 一旦连接建立(握手完成),则该连接会在连接池共享,在此阶段所有对该连接的操作都需要加锁
 */
接下来看看两个方法:
/** Returns true if this connection is ready to host new streams. */
fun isHealthy(doExtensiveChecks: Boolean): Boolean {
    assertThreadDoesntHoldLock()

    val nowNs = System.nanoTime()

    val rawSocket = this.rawSocket!!
    val socket = this.socket!!
    val source = this.source!!
    // 判断各个 socket 是否关闭
    if (rawSocket.isClosed || socket.isClosed || socket.isInputShutdown ||
        socket.isOutputShutdown) {
        return false
    }

    // http2 连接则委托
    val http2Connection = this.http2Connection
    if (http2Connection != null) {
        return http2Connection.isHealthy(nowNs)
    }

    // 距离上次检测时间是否长
    val idleDurationNs = synchronized(this) { nowNs - idleAtNs }
    if (idleDurationNs >= IDLE_CONNECTION_HEALTHY_NS && doExtensiveChecks) {
        // 检查 socket 是否可用
        return socket.isHealthy(source)
    }

    return true
}
isHealthy 该方法主要为检查一个 Connection 是否可以添加一个新的 IO 流,来发送数据。
/**
   * Returns true if this connection can carry a stream allocation to `address`. If non-null
   * `route` is the resolved route for a connection.
   */
internal fun isEligible(address: Address, routes: List<Route>?): Boolean {
    assertThreadHoldsLock()

    // If this connection is not accepting new exchanges, we're done.
    // 如果这个 connection 标记不接受任何新的 exchanges
    if (calls.size >= allocationLimit || noNewExchanges) return false

    // If the non-host fields of the address don't overlap, we're done.
    // 如果 Address 中除了 host 字段其他的存在不相等(Proxy 设置, SSL 设置或 DNS 配置不一致)
    if (!this.route.address.equalsNonHost(address)) return false

    // If the host exactly matches, we're done: this connection can carry the address.
    // 如果 host 匹配
    if (address.url.host == this.route().address.url.host) {
        return true // This connection is a perfect match.
    }

    // At this point we don't have a hostname match. But we still be able to carry the request if
    // our connection coalescing requirements are met. See also:
    // https://hpbn.co/optimizing-application-delivery/#eliminate-domain-sharding
    // https://daniel.haxx.se/blog/2016/08/18/http2-connection-coalescing/
    // 到这之后没有 hostname 匹配,但我们仍可以尝试合并请求。

    // 1. This connection must be HTTP/2.
    // 1. 必须为 HTTP/2
    if (http2Connection == null) return false

    // 2. The routes must share an IP address.
    // 2. 这个 Routes 必须共享 IP 地址(共享 InetSocket 对象,并且没有使用 Proxy)
    if (routes == null || !routeMatchesAny(routes)) return false

    // 3. This connection's server certificate's must cover the new host.
    // 3. 该 Connection 使用的证书必须与新主机的一致
    if (address.hostnameVerifier !== OkHostnameVerifier) return false
    if (!supportsUrl(address.url)) return false

    // 4. Certificate pinning must match the host.
    // 4. 证书 pinning 必须与新主机匹配
    try {
        address.certificatePinner!!.check(address.url.host, handshake()!!.peerCertificates)
    } catch (_: SSLPeerUnverifiedException) {
        return false
    }

    return true // The caller's address can be carried by this connection.
}
该方法为连接复用的关键方法!!!该方法判断一个 此次 exchange 能否是有该 connection,这里传入 Address 与 List<Router> 来判断。
RouterSelector
路由选择器,主要为选择一个可以到达源服务器的路由

首先是构造方法,需要传入 Address, RouteDatabase, Call 与 EventListener。然后调用 hasNext() 与 next() 方法进行路由选择 。
先来看看 RouteDatabase
/**
 * A blacklist of failed routes to avoid when creating a new connection to a target address. This is
 * used so that OkHttp can learn from its mistakes: if there was a failure attempting to connect to
 * a specific IP address or proxy server, that failure is remembered and alternate routes are
 * preferred.
 */
class RouteDatabase {
  private val failedRoutes = mutableSetOf<Route>()

  /** Records a failure connecting to [failedRoute]. */
  @Synchronized fun failed(failedRoute: Route) {
    failedRoutes.add(failedRoute)
  }

  /** Records success connecting to [route]. */
  @Synchronized fun connected(route: Route) {
    failedRoutes.remove(route)
  }

  /** Returns true if [route] has failed recently and should be avoided. */
  @Synchronized fun shouldPostpone(route: Route): Boolean = route in failedRoutes
}
比较简单,就是储存失败的 路由,没有啥特别的。
接下来看看 next 方法:
@Throws(IOException::class)
operator fun next(): Selection {
    if (!hasNext()) throw NoSuchElementException()

    // Compute the next set of routes to attempt.
    val routes = mutableListOf<Route>()
    while (hasNextProxy()) { // 如果没有代理
        // Postponed routes are always tried last. For example, if we have 2 proxies and all the
        // routes for proxy1 should be postponed, we'll move to proxy2. Only after we've exhausted
        // all the good routes will we attempt the postponed routes.
        val proxy = nextProxy() // 一级一级代理尝试,当一级代理可以成功时,则不会进入二级代理的循环
        for (inetSocketAddress in inetSocketAddresses) {
            // 实例化 Route
            val route = Route(address, proxy, inetSocketAddress)
            // 如果 routeDatabase 中含有该 route,则加入备用名单
            if (routeDatabase.shouldPostpone(route)) {
                postponedRoutes += route
            } else {
                // 否则加入 routes 结果
                routes += route
            }
        }

        // 如果有非备用结果,则直接跳出循环,不在尝试下一级代理
        if (routes.isNotEmpty()) {
            break
        }
    }

    if (routes.isEmpty()) {
        // We've exhausted all Proxies so fallback to the postponed routes.
        // 如果没有非备用结果,没有x
        routes += postponedRoutes
        postponedRoutes.clear()
    }

    return Selection(routes)
}
接下来看看 nextProxy 方法:
init {
    resetNextProxy(address.url, address.proxy)
}

private fun resetNextProxy(url: HttpUrl, proxy: Proxy?) {
    fun selectProxies(): List<Proxy> {
        // If the user specifies a proxy, try that and only that.
        // 如果用户指定了一个确定的 proxy,则只使用用户指定的
        if (proxy != null) return listOf(proxy)

        // If the URI lacks a host (as in "http://</"), don't call the ProxySelector.
        // 如果没指定 host (url 中没有 主机号),则不适用 代理
        val uri = url.toUri()
        if (uri.host == null) return immutableListOf(Proxy.NO_PROXY)

        // Try each of the ProxySelector choices until one connection succeeds.
        // 调用 address 中的 proxySelector 来选择一个 proxy,否则使用无代理
        val proxiesOrNull = address.proxySelector.select(uri)
        if (proxiesOrNull.isNullOrEmpty()) return immutableListOf(Proxy.NO_PROXY)

        return proxiesOrNull.toImmutableList()
    }

    eventListener.proxySelectStart(call, url)
    // 赋值给 proxies
    proxies = selectProxies()
    nextProxyIndex = 0
    eventListener.proxySelectEnd(call, url, proxies)
}

@Throws(IOException::class)
private fun nextProxy(): Proxy {
    if (!hasNextProxy()) {
        throw SocketException(
            "No route to ${address.url.host}; exhausted proxy configurations: $proxies")
    }
    // 从 proxies 中找出下一个调用 resetNextInetSocketAddress 方法
    val result = proxies[nextProxyIndex++]
    resetNextInetSocketAddress(result)
    return result
}
可以看到核心在于 resetNextInetSocketAddress 方法,但我们这里先看看初始化时的调用,在 init 中调用了 resetNextProxy,其中在某种情况下调用了 address.proxySelector.select(uri) 来选择代理,这里 proxySelector 实际上是 java 中的接口,位于 java.net.proxySelector,这里暂时不做分析 ,可以简单理解为获取系统的代理设置。
然后来到 resetNextInetSocketAddress 方法:
/** Prepares the socket addresses to attempt for the current proxy or host. */
@Throws(IOException::class)
private fun resetNextInetSocketAddress(proxy: Proxy) {
    // Clear the addresses. Necessary if getAllByName() below throws!
    val mutableInetSocketAddresses = mutableListOf<InetSocketAddress>()
    inetSocketAddresses = mutableInetSocketAddresses

    val socketHost: String
    val socketPort: Int
    // 如果直连,或使用 SOKCS 代理,直接使用 address url 中的 host 与 port
    if (proxy.type() == Proxy.Type.DIRECT || proxy.type() == Proxy.Type.SOCKS) {
        socketHost = address.url.host
        socketPort = address.url.port
    } else {
        // 否则 使用 proxy 中 (HTTP 代理)
        val proxyAddress = proxy.address()
        require(proxyAddress is InetSocketAddress) {
            "Proxy.address() is not an InetSocketAddress: ${proxyAddress.javaClass}"
        }
        socketHost = proxyAddress.socketHost
        socketPort = proxyAddress.port
    }

    // 检查端口
    if (socketPort !in 1..65535) {
        throw SocketException("No route to $socketHost:$socketPort; port is out of range")
    }

    // 如果为 SOCKS 则调用 InetSocketAddress.createUnresolved 获取
    if (proxy.type() == Proxy.Type.SOCKS) {
        mutableInetSocketAddresses += InetSocketAddress.createUnresolved(socketHost, socketPort)
    } else {
        eventListener.dnsStart(call, socketHost)

        // Try each address for best behavior in mixed IPv4/IPv6 environments.
        // 调用 dns.lookup 获取 address 列表
        val addresses = address.dns.lookup(socketHost)
        if (addresses.isEmpty()) {
            throw UnknownHostException("${address.dns} returned no addresses for $socketHost")
        }

        eventListener.dnsEnd(call, socketHost, addresses)

        // 添加
        for (inetAddress in addresses) {
            mutableInetSocketAddresses += InetSocketAddress(inetAddress, socketPort)
        }
    }
}
主要是根据当前 proxy 与 host 生成 socket addresses,最终将在 inetSocketAddresses 中放入能用的 InetSocketAddress 对象,而在 next() 方法循环中会遍历 inetSocketAddresses 。
ExchangeFinder
让我们回到最初的起点~ 回到拦截器中的 ConnectInterceptor ,之前介绍过,其调用了 call.initExchange 方法,最终会调用 ExchangFinder 方法选择一个 ExchangeCodec,让我们看看该 find 方法:
fun find(
    client: OkHttpClient,
    chain: RealInterceptorChain
): ExchangeCodec {
    try {
        // 调用 findHealthyConnection 方法
        val resultConnection = findHealthyConnection(
            connectTimeout = chain.connectTimeoutMillis,
            readTimeout = chain.readTimeoutMillis,
            writeTimeout = chain.writeTimeoutMillis,
            pingIntervalMillis = client.pingIntervalMillis,
            connectionRetryEnabled = client.retryOnConnectionFailure,
            doExtensiveHealthChecks = chain.request.method != "GET"
        )
        return resultConnection.newCodec(client, chain)
    } catch (e: RouteException) {
        trackFailure(e.lastConnectException)
        throw e
    } catch (e: IOException) {
        trackFailure(e)
        throw RouteException(e)
    }
}
来到 findHealthyConnection 方法:
/**
   * Finds a connection and returns it if it is healthy. If it is unhealthy the process is repeated
   * until a healthy connection is found.
   */
@Throws(IOException::class)
private fun findHealthyConnection(
    connectTimeout: Int,
    readTimeout: Int,
    writeTimeout: Int,
    pingIntervalMillis: Int,
    connectionRetryEnabled: Boolean,
    doExtensiveHealthChecks: Boolean
): RealConnection {
    while (true) {
        // 寻找可用的 连接
        val candidate = findConnection(
            connectTimeout = connectTimeout,
            readTimeout = readTimeout,
            writeTimeout = writeTimeout,
            pingIntervalMillis = pingIntervalMillis,
            connectionRetryEnabled = connectionRetryEnabled
        )

        // Confirm that the connection is good.
        // 调用之前的 connection.isHealthy 方法判断是否可以复用
        if (candidate.isHealthy(doExtensiveHealthChecks)) {
            return candidate
        }

        // If it isn't, take it out of the pool.
        candidate.noNewExchanges()

        // Make sure we have some routes left to try. One example where we may exhaust all the routes
        // would happen if we made a new connection and it immediately is detected as unhealthy.
        if (nextRouteToTry != null) continue

        val routesLeft = routeSelection?.hasNext() ?: true
        if (routesLeft) continue

        val routesSelectionLeft = routeSelector?.hasNext() ?: true
        if (routesSelectionLeft) continue

        throw IOException("exhausted all routes")
    }
}
调用了 findConnection 方法,然后调用 找到的 connection.isHealthy 方法判断能否复用,这里来到 findConnection 方法:
该方法有点长,足足有 200 多行:
/**
   * Returns a connection to host a new stream. This prefers the existing connection if it exists,
   * then the pool, finally building a new connection.
   *
   * This checks for cancellation before each blocking operation.
   */
@Throws(IOException::class)
private fun findConnection(
    connectTimeout: Int,
    readTimeout: Int,
    writeTimeout: Int,
    pingIntervalMillis: Int,
    connectionRetryEnabled: Boolean
): RealConnection {
    if (call.isCanceled()) throw IOException("Canceled")

    // Attempt to reuse the connection from the call.
    val callConnection = call.connection // This may be mutated by releaseConnectionNoEvents()!
    if (callConnection != null) {
        var toClose: Socket? = null
        synchronized(callConnection) {
            if (callConnection.noNewExchanges || !sameHostAndPort(callConnection.route().address.url)) {
                toClose = call.releaseConnectionNoEvents()
            }
        }

        // If the call's connection wasn't released, reuse it. We don't call connectionAcquired() here
        // because we already acquired it.
        if (call.connection != null) {
            check(toClose == null)
            return callConnection
        }

        // The call's connection was released.
        toClose?.closeQuietly()
        eventListener.connectionReleased(call, callConnection)
    }

    // We need a new connection. Give it fresh stats.
    refusedStreamCount = 0
    connectionShutdownCount = 0
    otherFailureCount = 0

    // Attempt to get a connection from the pool.
    if (connectionPool.callAcquirePooledConnection(address, call, null, false)) {
        val result = call.connection!!
        eventListener.connectionAcquired(call, result)
        return result
    }

    // Nothing in the pool. Figure out what route we'll try next.
    val routes: List<Route>?
    val route: Route
    if (nextRouteToTry != null) {
        // Use a route from a preceding coalesced connection.
        routes = null
        route = nextRouteToTry!!
        nextRouteToTry = null
    } else if (routeSelection != null && routeSelection!!.hasNext()) {
        // Use a route from an existing route selection.
        routes = null
        route = routeSelection!!.next()
    } else {
        // Compute a new route selection. This is a blocking operation!
        var localRouteSelector = routeSelector
        if (localRouteSelector == null) {
            localRouteSelector = RouteSelector(address, call.client.routeDatabase, call, eventListener)
            this.routeSelector = localRouteSelector
        }
        val localRouteSelection = localRouteSelector.next()
        routeSelection = localRouteSelection
        routes = localRouteSelection.routes

        if (call.isCanceled()) throw IOException("Canceled")

        // Now that we have a set of IP addresses, make another attempt at getting a connection from
        // the pool. We have a better chance of matching thanks to connection coalescing.
        if (connectionPool.callAcquirePooledConnection(address, call, routes, false)) {
            val result = call.connection!!
            eventListener.connectionAcquired(call, result)
            return result
        }

        route = localRouteSelection.next()
    }

    // Connect. Tell the call about the connecting call so async cancels work.
    val newConnection = RealConnection(connectionPool, route)
    call.connectionToCancel = newConnection
    try {
        newConnection.connect(
            connectTimeout,
            readTimeout,
            writeTimeout,
            pingIntervalMillis,
            connectionRetryEnabled,
            call,
            eventListener
        )
    } finally {
        call.connectionToCancel = null
    }
    call.client.routeDatabase.connected(newConnection.route())

    // If we raced another call connecting to this host, coalesce the connections. This makes for 3
    // different lookups in the connection pool!
    if (connectionPool.callAcquirePooledConnection(address, call, routes, true)) {
        val result = call.connection!!
        nextRouteToTry = route
        newConnection.socket().closeQuietly()
        eventListener.connectionAcquired(call, result)
        return result
    }

    synchronized(newConnection) {
        connectionPool.put(newConnection)
        call.acquireConnectionNoEvents(newConnection)
    }

    eventListener.connectionAcquired(call, newConnection)
    return newConnection
}
比较长,主要是调用了三次 callAcquirePooledConnection 方法,第一次调用 routes 为 null,则会直接进行 address 判断,当调用后无法找到连接,则使用路由选择器选择路由,并将选择的路由传入 callAcquirePooledConnection 方法。具体过程在 connectionPool 时已经分析。最后一次是合并连接。最终会来到 Connection.newCodec(client, chain) 方法,
Cache 过程
讲到 Cache 绕不开 CacheInterceptor,让我们先来看看该类:
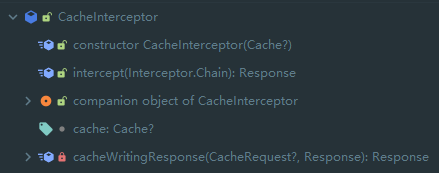
首先可以看到构造方法传入了一个 Cache 对象,让我们首先分析一下这个对象:、
Cache
来看看构造方法:
class Cache internal constructor(
    directory: File,
    maxSize: Long,
    fileSystem: FileSystem
) : Closeable, Flushable {
    internal val cache = DiskLruCache(
        fileSystem = fileSystem,
        directory = directory,
        appVersion = VERSION,
        valueCount = ENTRY_COUNT,
        maxSize = maxSize,
        taskRunner = TaskRunner.INSTANCE
    )
首先传入路径,然后是最大尺寸,最后还传入了一个 FileSystem 接口,我们来看看该接口:
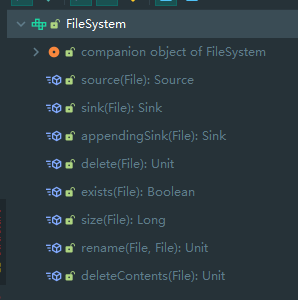
实际上就是将 File 对象转换为 Okio 的对象的工具类,默认实现也是直接使用 Okio 构造流,这里不给出。
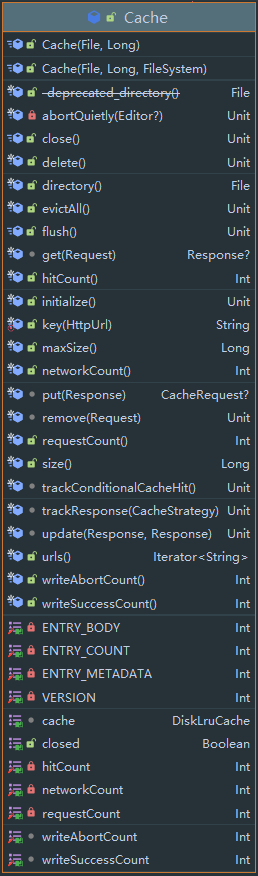
然后我们注意到 Cache 在初始化时构造了一个 DiskLruCache 对象。从名字来分析,该类是一个 硬盘缓存类,使用 Lru 缓存协议。
我们先来看看 Cache 的相关方法,主要是 put 与 get :
internal fun get(request: Request): Response? {
    val key = key(request.url)
    val snapshot: DiskLruCache.Snapshot = try {
        cache[key] ?: return null
    } catch (_: IOException) {
        return null // Give up because the cache cannot be read.
    }

    val entry: Entry = try {
        Entry(snapshot.getSource(ENTRY_METADATA))
    } catch (_: IOException) {
        snapshot.closeQuietly()
        return null
    }

    val response = entry.response(snapshot)
    if (!entry.matches(request, response)) {
        response.body?.closeQuietly()
        return null
    }

    return response
}

internal fun put(response: Response): CacheRequest? {
    val requestMethod = response.request.method

    if (HttpMethod.invalidatesCache(response.request.method)) {
        try {
            remove(response.request)
        } catch (_: IOException) {
            // The cache cannot be written.
        }
        return null
    }

    if (requestMethod != "GET") {
        // Don't cache non-GET responses. We're technically allowed to cache HEAD requests and some
        // POST requests, but the complexity of doing so is high and the benefit is low.
        return null
    }

    if (response.hasVaryAll()) {
        return null
    }

    val entry = Entry(response)
    var editor: DiskLruCache.Editor? = null
    try {
        editor = cache.edit(key(response.request.url)) ?: return null
        entry.writeTo(editor)
        return RealCacheRequest(editor)
    } catch (_: IOException) {
        abortQuietly(editor)
        return null
    }
}
可以看到首先调用 cache 变量的相关方法进行操作,其中 get 方法为获取一个 Snapshot 快照,因此我们先来分析 cache 变量,也就是 DiskLruCache 。
DiskLruCache
关于这个东西,实际上可以说是参考了另一个开源项目:
其中的关系与过程我没有了解,但是两者的实现差不多,这里以 Okhttp3 中的源码来讲解,有机会单独讲一下该项目。
概述
该库实现了硬盘缓存,并且采用 Lru 协议,先来看看单独使用该缓存的用法,首先是存(省略初始化过程):
fun write(key: String, value String){
    diskLruCache.edit("Key").let{ // 获取 edit
        // 获取 sink 流并写入
        newSihnk(ENTRY_METADATA).buffer().use{sink ->
            sink.writeUtf8("8")
        }
        // 调用 commit 提交
    }.commit();
}
然后是取:
fun read(key: String, index: Int): String? {
    val snapshot: DiskLruCache.Snapshot = try {
        // 获取快照
        cache[key] ?: return null
    } catch (_: IOException) {
        // 有 IO 异常
        return null
    }
    // 从快照中获取信息
    return snapshot.getSource(index).readUtf8Line();
}
也就是说,该 DiskLruCache 实现了一个类似 LinkedHashMap 的数据结构,含有 put 和 get 方法,同时将数据存到文件中,同时使用 LRU 协议来淘汰过久未使用的数据 。
并且,每个 Key 都会对应多个文件,一个 Key 与 一个 Index 可以确定一个文件。但是对于 Lru 规则的过期,是按照 Key 来过期的,一旦一个 Key 被删除,所有文件都会被删除。
Journal 文件
DiskLruCache 内部维护了一个 LinkedHashMap 来缓存,而为了进行数据持久,同时维护了一个日志文件,也就是 Journal 文件,该文件可以理解为是 LinkedHashMap 的操作日志,每次启动的时候都根据该文件还原(实际上一个 key 都会有 多个 文件,只是 Journal 文件标记了操作日志,当最终写入读取时,是写入或读取 key 对应文件)。
以下是该文件的一个示例:
/*
 *     libcore.io.DiskLruCache
 *     1
 *     100
 *     2
 *
 *     CLEAN 3400330d1dfc7f3f7f4b8d4d803dfcf6 832 21054
 *     DIRTY 335c4c6028171cfddfbaae1a9c313c52
 *     CLEAN 335c4c6028171cfddfbaae1a9c313c52 3934 2342
 *     REMOVE 335c4c6028171cfddfbaae1a9c313c52
 *     DIRTY 1ab96a171faeeee38496d8b330771a7a
 *     CLEAN 1ab96a171faeeee38496d8b330771a7a 1600 234
 *     READ 335c4c6028171cfddfbaae1a9c313c52
 *     READ 3400330d1dfc7f3f7f4b8d4d803dfcf6
 */
其中前五行为文件头,每次启动的时候都会检查这五行数据是否合法
- 第一行:固定字符串 libcore.io.DiskLruCache
- 第二行:DiskLruCache 的版本号
- 第三行:应用程序的版本号,运行过程中会与代码中存储的版本比较,对于旧版本的 Journal 文件会直接删除
- 第四行:指每个 Key 对应几个文件
- 空行
然后以下是操作记录,一行一条记录,其中有四种记录:
- DIRTY :后面跟着缓存文件的 Key,表示文件开始被写入(DiskLruCache 将该文件的 Source 给了外部)
- CLEAN:后面跟着缓存文件的 Key 与该 Key 对应每个文件的长度(多个文件对应多个长度),一般为代码中调用 DiskLruCache.edit.Commit 方法时如果成功则会写入该记录。
- REMOVE:后面跟着缓存文件的 Key,表示写入失败或手动删除 Key,(edit 回滚或手动删除)
- READ:表示一次读取记录,一般为代码中获取某个 Key 的快照
源码
首先是 Entry:
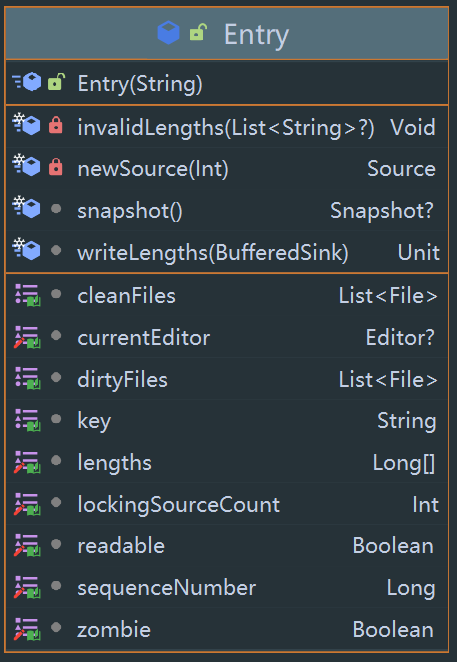
一个 Entry 储存一个 Key 对应的文件的信息,其中有两个 File 列表,cleanFiles 存的是 Key 对应各个文件的信息,而 dirtyFiles 存的是 Key 对应各个文件的临时信息,拥有 temp 后缀,在 写入时,如果还没 commit,数据则会写在临时文件中,直到 commit 才会真正写入 cleanFiles 。
其中还有一些标记,比如 readable 是否可读,zombie 是否变成僵尸文件(已经需要删除,但是因为当前某个线程正在读,因此等到这次读取完毕后就会删除)等。
首先分析 snapshot 方法:
/**
     * Returns a snapshot of this entry. This opens all streams eagerly to guarantee that we see a
     * single published snapshot. If we opened streams lazily then the streams could come from
     * different edits.
     */
internal fun snapshot(): Snapshot? {
    this@DiskLruCache.assertThreadHoldsLock()

    // 判断是否可读
    if (!readable) return null
    if (!civilizedFileSystem && (currentEditor != null || zombie)) return null

    val sources = mutableListOf<Source>()

    // 克隆一个当前状态各个文件的大小
    val lengths = this.lengths.clone() // Defensive copy since these can be zeroed out.
    try {
        // 将每个文件的 Source 添加到 sources
        for (i in 0 until valueCount) {
            sources += newSource(i)
        }
        // 返回快照
        return Snapshot(key, sequenceNumber, sources, lengths)
    } catch (_: FileNotFoundException) {
        // A file must have been deleted manually!
        for (source in sources) {
            source.closeQuietly()
        }
        // Since the entry is no longer valid, remove it so the metadata is accurate (i.e. the cache
        // size.)
        // 如果出现 FileNotFound,则该 Entry 没有存在的必要,则调用 removeEntry 方法将自己移除
        try {
            removeEntry(this)
        } catch (_: IOException) {
        }
        return null
    }
}
可以看到 snapshot 中调用了newSource 方法来获取 Source:
private fun newSource(index: Int): Source {
    // 调用 fileSystem.sorce 来获取 Source
    val fileSource = fileSystem.source(cleanFiles[index])

    // 如果 fileSystem 被污染(发现其他进程也在使用该路径等)
    if (civilizedFileSystem) return fileSource

    // 计数器加一
    lockingSourceCount++
    // 使用 ForwardingSource 包装原 source,主要是 重写 closed 方法,进行计数器的操作以及判断 zombie
    return object : ForwardingSource(fileSource) {
        private var closed = false
        override fun close() {
            super.close()
            if (!closed) {
                closed = true
                synchronized(this@DiskLruCache) {
                    lockingSourceCount--
                    if (lockingSourceCount == 0 && zombie) {
                        removeEntry(this@Entry)
                    }
                }
            }
        }
    }
}
回到 DiskLruCache,首先它维护了一个 LinkedHashMap:
internal val lruEntries = LinkedHashMap<String, Entry>(0, 0.75f, true)
其中 初始容量为 0,装载因子为 0.75,使用 LRU 。
然后 DiskLruCache 还维护了一个 jornalFile:
private val journalFile: File // journal 文件
private val journalFileTmp: File // 临时 journal 文件
private val journalFileBackup: File // 后台 journal 文件

init {
    require(maxSize > 0L) { "maxSize <= 0" }
    require(valueCount > 0) { "valueCount <= 0" }

    //  @JvmField val JOURNAL_FILE = "journal"
    this.journalFile = File(directory, JOURNAL_FILE)

    // @JvmField val JOURNAL_FILE_TEMP = "journal.tmp"
    this.journalFileTmp = File(directory, JOURNAL_FILE_TEMP)

    // @JvmField val JOURNAL_FILE_BACKUP = "journal.bkp"
    this.journalFileBackup = File(directory, JOURNAL_FILE_BACKUP)
}
先来看看 DiskLruCache 的 initialize() 方法:
@Synchronized @Throws(IOException::class)
fun initialize() {
    // 确保没有持有锁
    this.assertThreadHoldsLock()

    // 只初始化一次
    if (initialized) {
        return // Already initialized.
    }

    // If a bkp file exists, use it instead.
    // 如果 journalFileBackup 文件存在,则有可能使用它代替 journal 文件
    if (fileSystem.exists(journalFileBackup)) {
        // If journal file also exists just delete backup file.
        // 根据 journal 文件是否存在来决定是删除 bkp 文件还是使用 bkp 文件
        if (fileSystem.exists(journalFile)) {
            fileSystem.delete(journalFileBackup)
        } else {
            fileSystem.rename(journalFileBackup, journalFile)
        }
    }

    civilizedFileSystem = fileSystem.isCivilized(journalFileBackup)

    // Prefer to pick up where we left off.
    if (fileSystem.exists(journalFile)) {
        try {
            // 将 journal 文件读取,根据日志来恢复 lruEntries 变量
            readJournal()
            // 计算初始大小,删除过期的数据以及脏数据。
            processJournal()
            initialized = true
            return
        } catch (journalIsCorrupt: IOException) {
            Platform.get().log(
                "DiskLruCache $directory is corrupt: ${journalIsCorrupt.message}, removing",
                WARN,
                journalIsCorrupt)
        }

        // The cache is corrupted, attempt to delete the contents of the directory. This can throw and
        // we'll let that propagate out as it likely means there is a severe filesystem problem.
        // 到此说明缓存损坏,尝试删除文件
        try {
            delete()
        } finally {
            closed = false
        }
    }

    // 重建新的 Journal 文件
    rebuildJournal()

    initialized = true
}
可以看到,首先判断文件,然后调用 readJournal() 与 processJournal() 方法,如果成功则直接返回,否则调用 rebuildJournal() 方法重建,来看看:
@Throws(IOException::class)
private fun readJournal() {
    fileSystem.source(journalFile).buffer()
    .use { source ->

          // 读前五行
          val magic = source.readUtf8LineStrict()
          val version = source.readUtf8LineStrict()
          val appVersionString = source.readUtf8LineStrict()
          val valueCountString = source.readUtf8LineStrict()
          val blank = source.readUtf8LineStrict()

          // 前五行文件头判断
          if (MAGIC != magic ||
              VERSION_1 != version ||
              appVersion.toString() != appVersionString ||
              valueCount.toString() != valueCountString ||
              blank.isNotEmpty()) {
              throw IOException(
                  "unexpected journal header: [$magic, $version, $valueCountString, $blank]")
          }

          var lineCount = 0
          while (true) {
              try {
                  // 按行读
                  readJournalLine(source.readUtf8LineStrict())
                  lineCount++
              } catch (_: EOFException) {
                  break // End of journal.
              }
          }

          redundantOpCount = lineCount - lruEntries.size

          // If we ended on a truncated line, rebuild the journal before appending to it.
          // 如果读到文件末尾,发现不完整的行,则调用 rebuildJournal 重建
          // 上面抛出 EOF 异常,而 source 依然可读,说明最后一行不完整。
          if (!source.exhausted()) {
              rebuildJournal()
          } else {
              journalWriter = newJournalWriter()
          }
         }
}
可以看到首先读前五行作为文件头,然后判断合法,然后调用 readJournalLine(source.readUtf8LineStrict()) 将每行指令的数据进行对应操作:
@Throws(IOException::class)
private fun readJournalLine(line: String) {
    val firstSpace = line.indexOf(' ')
    if (firstSpace == -1) throw IOException("unexpected journal line: $line")

    val keyBegin = firstSpace + 1
    val secondSpace = line.indexOf(' ', keyBegin)
    val key: String
    if (secondSpace == -1) {
        key = line.substring(keyBegin)
        if (firstSpace == REMOVE.length && line.startsWith(REMOVE)) {
            lruEntries.remove(key)
            return
        }
    } else {
        key = line.substring(keyBegin, secondSpace)
    }

    var entry: Entry? = lruEntries[key]
    if (entry == null) {
        // 若 Key 不存在,则添加 Key
        entry = Entry(key)
        lruEntries[key] = entry
    }

    when {
        secondSpace != -1 && firstSpace == CLEAN.length && line.startsWith(CLEAN) -> {
            // CLEAN 指令,将文件大小赋值,将可读标记变为可读,将 currentEditor 置空
            val parts = line.substring(secondSpace + 1)
            .split(' ')
            entry.readable = true
            entry.currentEditor = null
            entry.setLengths(parts)
        }

        secondSpace == -1 && firstSpace == DIRTY.length && line.startsWith(DIRTY) -> {
            // DIRTY 指令,直接开启 Editor 模拟操作
            entry.currentEditor = Editor(entry)
        }

        secondSpace == -1 && firstSpace == READ.length && line.startsWith(READ) -> {
            // READ 指令不用做任何操作
            // This work was already done by calling lruEntries.get().
        }

        else -> throw IOException("unexpected journal line: $line")
    }
}
至此,ReadJournal 分析完毕,接下来是 processJournal 方法:
/**
   * Computes the initial size and collects garbage as a part of opening the cache. Dirty entries
   * are assumed to be inconsistent and will be deleted.
   */
@Throws(IOException::class)
private fun processJournal() {
    // 删除临时文件
    fileSystem.delete(journalFileTmp)
    // 遍历 lruEntries
    val i = lruEntries.values.iterator()
    while (i.hasNext()) {
        val entry = i.next()
        // 如果当前没有线程在写
        if (entry.currentEditor == null) {
            for (t in 0 until valueCount) {
                // 更新 size 变量
                size += entry.lengths[t]
            }
        } else {
            // 如果有线程再写
            entry.currentEditor = null
            // 删除该 key 对应的所有文件并删除该 entry
            for (t in 0 until valueCount) {
                fileSystem.delete(entry.cleanFiles[t])
                fileSystem.delete(entry.dirtyFiles[t])
            }
            i.remove()
        }
    }
}
接下来看看 rebuildJournal 方法,实际上只有在该方法中会用到 temp 文件:
/**
   * Creates a new journal that omits redundant information. This replaces the current journal if it
   * exists.
   */
@Synchronized @Throws(IOException::class)
internal fun rebuildJournal() {
    journalWriter?.close()

    // 写入 temp 文件
    fileSystem.sink(journalFileTmp).buffer()
    .use { sink ->
          // 写入文件头
          sink.writeUtf8(MAGIC).writeByte('\n'.toInt())
          sink.writeUtf8(VERSION_1).writeByte('\n'.toInt())
          sink.writeDecimalLong(appVersion.toLong()).writeByte('\n'.toInt())
          sink.writeDecimalLong(valueCount.toLong()).writeByte('\n'.toInt())
          sink.writeByte('\n'.toInt())

          // 给 lruEntries 中每个 entry 都写入对应日志,如果有线程在读,则写入 DIRTY 否则 写入 CLEAN
          for (entry in lruEntries.values) {
              if (entry.currentEditor != null) {
                  sink.writeUtf8(DIRTY).writeByte(' '.toInt())
                  sink.writeUtf8(entry.key)
                  sink.writeByte('\n'.toInt())
              } else {
                  sink.writeUtf8(CLEAN).writeByte(' '.toInt())
                  sink.writeUtf8(entry.key)
                  entry.writeLengths(sink)
                  sink.writeByte('\n'.toInt())
              }
          }
         }

    // 将 journalFile 变为 bkp 文件
    if (fileSystem.exists(journalFile)) {
        fileSystem.rename(journalFile, journalFileBackup)
    }
    // 将 temp 文件重命名为 journal 文件
    fileSystem.rename(journalFileTmp, journalFile)
    fileSystem.delete(journalFileBackup)

    journalWriter = newJournalWriter()
    hasJournalErrors = false
    mostRecentRebuildFailed = false
}
接下来让我们回到 get 方法:
/**
   * Returns a snapshot of the entry named [key], or null if it doesn't exist is not currently
   * readable. If a value is returned, it is moved to the head of the LRU queue.
   */
@Synchronized @Throws(IOException::class)
operator fun get(key: String): Snapshot? {
    // 初始化
    initialize()

    checkNotClosed()
    validateKey(key)
    val entry = lruEntries[key] ?: return null
    // 获取快照
    val snapshot = entry.snapshot() ?: return null

    redundantOpCount++
    // 向 journal 文件写入 READ 日志
    journalWriter!!.writeUtf8(READ)
    .writeByte(' '.toInt())
    .writeUtf8(key)
    .writeByte('\n'.toInt())
    // 如果需要重建则重建
    if (journalRebuildRequired()) {
        cleanupQueue.schedule(cleanupTask)
    }

    return snapshot
}
这里的 cleanupoTask 是一个任务,使用 queue 作为同步,之后会分析。
接下来看看 当我们调用 editor.commit 时会调用的方法:
/**
     * Commits this edit so it is visible to readers. This releases the edit lock so another edit
     * may be started on the same key.
     */
@Throws(IOException::class)
fun commit() {
    // 同步锁
    synchronized(this@DiskLruCache) {
        check(!done)
        if (entry.currentEditor == this) {
            // 调用 completeEdit 方法
            completeEdit(this, true)
        }
        done = true
    }
}
获取锁后回来到 completeEdit 方法:
@Synchronized @Throws(IOException::class)
internal fun completeEdit(editor: Editor, success: Boolean) {
    val entry = editor.entry
    check(entry.currentEditor == editor)

    // If this edit is creating the entry for the first time, every index must have a value.
    if (success && !entry.readable) {
        for (i in 0 until valueCount) {
            if (!editor.written!![i]) {
                editor.abort()
                throw IllegalStateException("Newly created entry didn't create value for index $i")
            }
            if (!fileSystem.exists(entry.dirtyFiles[i])) {
                editor.abort()
                return
            }
        }
    }

    for (i in 0 until valueCount) {
        val dirty = entry.dirtyFiles[i]
        if (success && !entry.zombie) {
            if (fileSystem.exists(dirty)) {
                val clean = entry.cleanFiles[i]
                // 将 dirty 的文件重命名为 clean
                fileSystem.rename(dirty, clean)
                val oldLength = entry.lengths[i]
                val newLength = fileSystem.size(clean)
                entry.lengths[i] = newLength
                size = size - oldLength + newLength
            }
        } else {
            fileSystem.delete(dirty)
        }
    }

    entry.currentEditor = null
    if (entry.zombie) {
        removeEntry(entry)
        return
    }

    redundantOpCount++
    journalWriter!!.apply {
        if (entry.readable || success) {
            entry.readable = true
            writeUtf8(CLEAN).writeByte(' '.toInt())
            writeUtf8(entry.key)
            entry.writeLengths(this)
            writeByte('\n'.toInt())
            if (success) {
                entry.sequenceNumber = nextSequenceNumber++
            }
        } else {
            lruEntries.remove(entry.key)
            writeUtf8(REMOVE).writeByte(' '.toInt())
            writeUtf8(entry.key)
            writeByte('\n'.toInt())
        }
        flush()
    }

    // 当 size 大于 maxSize 时,会触发 cleanupTask
    if (size > maxSize || journalRebuildRequired()) {
        cleanupQueue.schedule(cleanupTask)
    }
}
具体细节不多分析,主要是将 dirty 文件重命名为 clean 文件。具体看代码。
可以看到最后当判断 size > maxSize 时,会触发 cleanupQueue.schedule(cleanupTask),也就是运行 cleanupTask,让我们来看看该 task:
private val cleanupTask = object : Task("$okHttpName Cache") {
    override fun runOnce(): Long {
        synchronized(this@DiskLruCache) {
            if (!initialized || closed) {
                return -1L // Nothing to do.
            }

            try {
                // 修剪大小
                trimToSize()
            } catch (_: IOException) {
                mostRecentTrimFailed = true
            }

            try {
                // 如果需要就重建
                if (journalRebuildRequired()) {
                    rebuildJournal()
                    redundantOpCount = 0
                }
            } catch (_: IOException) {
                mostRecentRebuildFailed = true
                journalWriter = blackholeSink().buffer()
            }

            return -1L
        }
    }
}
让我们主要来看 trimToSize() 方法:
@Throws(IOException::class)
fun trimToSize() {
    while (size > maxSize) {
        if (!removeOldestEntry()) return
    }
    mostRecentTrimFailed = false
}


/** Returns true if an entry was removed. This will return false if all entries are zombies. */
private fun removeOldestEntry(): Boolean {
    // 这里的循环顺序为 LRU 顺序,这是 LinkedHashMap 的特性
    for (toEvict in lruEntries.values) {
        // 如果 zombie 为 false 则 remove
        if (!toEvict.zombie) {
            removeEntry(toEvict)
            return true
        }
    }
    return false
}
让我们回到 cache 的方法,看看其 key 的生成方式:
internal fun get(request: Request): Response? {
    // 获取 key
    val key = key(request.url)
    val snapshot: DiskLruCache.Snapshot = try {
        cache[key] ?: return null
    } catch (_: IOException) {
        return null // Give up because the cache cannot be read.
    }

    val entry: Entry = try {
        Entry(snapshot.getSource(ENTRY_METADATA))
    } catch (_: IOException) {
        snapshot.closeQuietly()
        return null
    }

    val response = entry.response(snapshot)
    if (!entry.matches(request, response)) {
        response.body?.closeQuietly()
        return null
    }

    return response
}
可以看到调用 key 方法计算 key:
@JvmStatic
fun key(url: HttpUrl): String = url.toString().encodeUtf8().md5().hex()
可以看到 key 的生成规则,utf-8 编码然后 md5
至此 Okhttp cache 就分析完毕,就这?太逊了。
怎么可能,让我们回到 最初的 CacheInterceptor 对象:
CacheInterceptor
直接看其 intercept 方法:
@Throws(IOException::class)
override fun intercept(chain: Interceptor.Chain): Response {
    val call = chain.call()

    // 调用 cache 的方法获取缓存
    val cacheCandidate = cache?.get(chain.request())

    val now = System.currentTimeMillis()

    // 调用 strategy 策略决定要发送的请求与响应的缓存
    val strategy = CacheStrategy.Factory(now, chain.request(), cacheCandidate).compute()
    val networkRequest = strategy.networkRequest
    val cacheResponse = strategy.cacheResponse

    cache?.trackResponse(strategy)
    val listener = (call as? RealCall)?.eventListener ?: EventListener.NONE

    if (cacheCandidate != null && cacheResponse == null) {
        // The cache candidate wasn't applicable. Close it.
        cacheCandidate.body?.closeQuietly()
    }

    // If we're forbidden from using the network and the cache is insufficient, fail.
    // 访问出错,返回 504
    if (networkRequest == null && cacheResponse == null) {
        return Response.Builder()
        .request(chain.request())
        .protocol(Protocol.HTTP_1_1)
        .code(HTTP_GATEWAY_TIMEOUT)
        .message("Unsatisfiable Request (only-if-cached)")
        .body(EMPTY_RESPONSE)
        .sentRequestAtMillis(-1L)
        .receivedResponseAtMillis(System.currentTimeMillis())
        .build().also {
            listener.satisfactionFailure(call, it)
        }
    }

    // If we don't need the network, we're done.
    // 不需要请求(策略决定出不需要发请求,直接返回 cache)
    if (networkRequest == null) {
        return cacheResponse!!.newBuilder()
        .cacheResponse(stripBody(cacheResponse))
        .build().also {
            listener.cacheHit(call, it)
        }
    }

    if (cacheResponse != null) {
        listener.cacheConditionalHit(call, cacheResponse)
    } else if (cache != null) {
        listener.cacheMiss(call)
    }

    // 需要请求了,继续交给拦截链
    var networkResponse: Response? = null
    try {
        networkResponse = chain.proceed(networkRequest)
    } finally {
        // If we're crashing on I/O or otherwise, don't leak the cache body.
        // 防止内存泄漏
        if (networkResponse == null && cacheCandidate != null) {
            cacheCandidate.body?.closeQuietly()
        }
    }


    // If we have a cache response too, then we're doing a conditional get.
    // 获取到结果了,可能需要缓存(旧的缓存存在)
    if (cacheResponse != null) {
        // 返回 304 直接更新缓存后返回
        if (networkResponse?.code == HTTP_NOT_MODIFIED) {
            // clone 一个 response
            val response = cacheResponse.newBuilder()
            .headers(combine(cacheResponse.headers, networkResponse.headers))
            .sentRequestAtMillis(networkResponse.sentRequestAtMillis)
            .receivedResponseAtMillis(networkResponse.receivedResponseAtMillis)
            .cacheResponse(stripBody(cacheResponse))
            .networkResponse(stripBody(networkResponse))
            .build()

            networkResponse.body!!.close()

            // Update the cache after combining headers but before stripping the
            // Content-Encoding header (as performed by initContentStream()).
            cache!!.trackConditionalCacheHit()
            // 更新新的缓存
            cache.update(cacheResponse, response)
            return response.also {
                listener.cacheHit(call, it)
            }
        } else {
            cacheResponse.body?.closeQuietly()
        }
    }

    // 原先没有缓存
    val response = networkResponse!!.newBuilder()
    .cacheResponse(stripBody(cacheResponse))
    .networkResponse(stripBody(networkResponse))
    .build()

    if (cache != null) {
        // 调用策略类判断是否可以缓存
        if (response.promisesBody() && CacheStrategy.isCacheable(response, networkRequest)) {
            // Offer this request to the cache.
            val cacheRequest = cache.put(response)
            return cacheWritingResponse(cacheRequest, response).also {
                if (cacheResponse != null) {
                    // This will log a conditional cache miss only.
                    listener.cacheMiss(call)
                }
            }
        }

        // 如果是设定不缓存的 method
        if (HttpMethod.invalidatesCache(networkRequest.method)) {
            try {
                cache.remove(networkRequest)
            } catch (_: IOException) {
                // The cache cannot be written.
            }
        }
    }

    return response
}
整体过程还是比较好理解的,接下来将会重点分析 CacheStrategy 类,
/**
 * Given a request and cached response, this figures out whether to use the network, the cache, or
 * both.
 *
 * Selecting a cache strategy may add conditions to the request (like the "If-Modified-Since" header
 * for conditional GETs) or warnings to the cached response (if the cached data is potentially
 * stale).
 */
class CacheStrategy internal constructor(
    /** The request to send on the network, or null if this call doesn't use the network. */
    val networkRequest: Request?,
    /** The cached response to return or validate; or null if this call doesn't use a cache. */
    val cacheResponse: Response?
) {
    class Factory(
        private val nowMillis: Long,
        internal val request: Request,
        private val cacheResponse: Response?
    ){
        // ……
    }
    companion object {
        /** Returns true if [response] can be stored to later serve another request. */
        fun isCacheable(response: Response, request: Request): Boolean {
            // Always go to network for uncacheable response codes (RFC 7231 section 6.1), This
            // implementation doesn't support caching partial content.
            // 拦截
            when (response.code) {
                HTTP_OK,
                HTTP_NOT_AUTHORITATIVE,
                HTTP_NO_CONTENT,
                HTTP_MULT_CHOICE,
                HTTP_MOVED_PERM,
                HTTP_NOT_FOUND,
                HTTP_BAD_METHOD,
                HTTP_GONE,
                HTTP_REQ_TOO_LONG,
                HTTP_NOT_IMPLEMENTED,
                StatusLine.HTTP_PERM_REDIRECT -> {
                    // These codes can be cached unless headers forbid it.
                    // 这些响应码默认都可以缓存,除非响应头中禁止
                }

                HTTP_MOVED_TEMP,
                StatusLine.HTTP_TEMP_REDIRECT -> {
                    // 这些响应码需要判断响头符合标准才可缓存
                    // These codes can only be cached with the right response headers.
                    // http://tools.ietf.org/html/rfc7234#section-3
                    // s-maxage is not checked because OkHttp is a private cache that should ignore s-maxage.
                    if (response.header("Expires") == null &&
                        response.cacheControl.maxAgeSeconds == -1 &&
                        !response.cacheControl.isPublic &&
                        !response.cacheControl.isPrivate) {
                        return false
                    }
                }

                else -> {
                    // All other codes cannot be cached.
                    // 其他响应码都不可缓存
                    return false
                }
            }

            // A 'no-store' directive on request or response prevents the response from being cached.
            // 请求和响应中是否有 no-store 标记
            // 以上 when 通过的代码将来到这里
            return !response.cacheControl.noStore && !request.cacheControl.noStore
        }
    }
}
首先 该策略类只要两个变量, networkRequest 代表要发送的请求,如果为 null 则代表当前 Call 不能使用网络。cacheResponse 代表缓存中的可用的 Response,为空则代表当前 Call 不适用缓存,真正的策略分析在 Factory 类中,此外,还有一个静态方法 isCacheable 用于判断该响应是否可以缓存。
接下来让我们重点分析该 Factory
首先是成员变量,和 init 语句:
class Factory(
    private val nowMillis: Long,
    internal val request: Request,
    private val cacheResponse: Response?
) {
    /** The server's time when the cached response was served, if known. */
    // 缓存对应的响应接收到的时间,如果知道
    private var servedDate: Date? = null
    private var servedDateString: String? = null

    /** The last modified date of the cached response, if known. */
    // 缓存响应的最后修改时间,如果知道
    private var lastModified: Date? = null
    private var lastModifiedString: String? = null

    /**
     * The expiration date of the cached response, if known. If both this field and the max age are
     * set, the max age is preferred.
     */
    // 缓存响应的过期时间,如果知道。如果该变量和 max age 同时存在,则以 max age 为准
    private var expires: Date? = null

    /**
     * Extension header set by OkHttp specifying the timestamp when the cached HTTP request was
     * first initiated.
     */
    //okhttp 第一次发起缓存请求的时间
    private var sentRequestMillis = 0L

    /**
     * Extension header set by OkHttp specifying the timestamp when the cached HTTP response was
     * first received.
     */
    // okhttp 第一次收到缓存响应的时间
    private var receivedResponseMillis = 0L

    /** Etag of the cached response. */
    // 缓存响应的 Etag
    private var etag: String? = null

    /** Age of the cached response. */
    // 缓存响应的年龄
    private var ageSeconds = -1

    /**
     * Returns true if computeFreshnessLifetime used a heuristic. If we used a heuristic to serve a
     * cached response older than 24 hours, we are required to attach a warning.
     */

    // 是否使用启发式(不按 http 规范的缓存,直接缓存,或者说 http 协议中没有指定缓存策略,由 okhttp 自己决定缓存)
    private fun isFreshnessLifetimeHeuristic(): Boolean {
        return cacheResponse!!.cacheControl.maxAgeSeconds == -1 && expires == null
    }

    init {
        // 更新以上的各种成员变量
        if (cacheResponse != null) {
            this.sentRequestMillis = cacheResponse.sentRequestAtMillis
            this.receivedResponseMillis = cacheResponse.receivedResponseAtMillis
            val headers = cacheResponse.headers
            for (i in 0 until headers.size) {
                val fieldName = headers.name(i)
                val value = headers.value(i)
                when {
                    fieldName.equals("Date", ignoreCase = true) -> {
                        servedDate = value.toHttpDateOrNull()
                        servedDateString = value
                    }
                    fieldName.equals("Expires", ignoreCase = true) -> {
                        expires = value.toHttpDateOrNull()
                    }
                    fieldName.equals("Last-Modified", ignoreCase = true) -> {
                        lastModified = value.toHttpDateOrNull()
                        lastModifiedString = value
                    }
                    fieldName.equals("ETag", ignoreCase = true) -> {
                        etag = value
                    }
                    fieldName.equals("Age", ignoreCase = true) -> {
                        ageSeconds = value.toNonNegativeInt(-1)
                    }
                }
            }
        }
    }
然后是 compute 方法,开始进行策略分析:
/** Returns a strategy to satisfy [request] using [cacheResponse]. */
fun compute(): CacheStrategy {
    val candidate = computeCandidate()

    // We're forbidden from using the network and the cache is insufficient.
    // only-if-cache 为true,并且缓存不足,我们直接返回 null
    if (candidate.networkRequest != null && request.cacheControl.onlyIfCached) {
        return CacheStrategy(null, null)
    }

    return candidate
}
可以看到最终是调用 computeCandidate() 方法
/** Returns a strategy to use assuming the request can use the network. */
private fun computeCandidate(): CacheStrategy {
    // No cached response.
    // cache 中没有(硬件设施不足啊)
    if (cacheResponse == null) {
        // 使用网络
        return CacheStrategy(request, null)
    }

    // Drop the cached response if it's missing a required handshake.
    // 如果为 https 并且缺少握手信息
    if (request.isHttps && cacheResponse.handshake == null) {
        return CacheStrategy(request, null)
    }

    // If this response shouldn't have been stored, it should never be used as a response source.
    // This check should be redundant as long as the persistence store is well-behaved and the
    // rules are constant.
    // 如果获取到的 cache 不可缓存,则使用网络(如果不出意外,这里不会被执行到)
    if (!isCacheable(cacheResponse, request)) {
        return CacheStrategy(request, null)
    }

    val requestCaching = request.cacheControl
    // 如果 noCache 标记为真
    // 或者请求中含有 If-Modified-Since 或者 If-None-Match 标记
    if (requestCaching.noCache || hasConditions(request)) {
        return CacheStrategy(request, null)
    }

    // 以下是各种判断,这里不详细给出 了
    val responseCaching = cacheResponse.cacheControl

    val ageMillis = cacheResponseAge()
    var freshMillis = computeFreshnessLifetime()

    if (requestCaching.maxAgeSeconds != -1) {
        freshMillis = minOf(freshMillis, SECONDS.toMillis(requestCaching.maxAgeSeconds.toLong()))
    }

    var minFreshMillis: Long = 0
    if (requestCaching.minFreshSeconds != -1) {
        minFreshMillis = SECONDS.toMillis(requestCaching.minFreshSeconds.toLong())
    }

    var maxStaleMillis: Long = 0
    if (!responseCaching.mustRevalidate && requestCaching.maxStaleSeconds != -1) {
        maxStaleMillis = SECONDS.toMillis(requestCaching.maxStaleSeconds.toLong())
    }

    if (!responseCaching.noCache && ageMillis + minFreshMillis < freshMillis + maxStaleMillis) {
        val builder = cacheResponse.newBuilder()
        if (ageMillis + minFreshMillis >= freshMillis) {
            builder.addHeader("Warning", "110 HttpURLConnection \"Response is stale\"")
        }
        val oneDayMillis = 24 * 60 * 60 * 1000L
        if (ageMillis > oneDayMillis && isFreshnessLifetimeHeuristic()) {
            builder.addHeader("Warning", "113 HttpURLConnection \"Heuristic expiration\"")
        }
        return CacheStrategy(null, builder.build())
    }

    // Find a condition to add to the request. If the condition is satisfied, the response body
    // will not be transmitted.
    val conditionName: String
    val conditionValue: String?
    when {
        etag != null -> {
            conditionName = "If-None-Match"
            conditionValue = etag
        }

        lastModified != null -> {
            conditionName = "If-Modified-Since"
            conditionValue = lastModifiedString
        }

        servedDate != null -> {
            conditionName = "If-Modified-Since"
            conditionValue = servedDateString
        }

        else -> return CacheStrategy(request, null) // No condition! Make a regular request.
    }

    val conditionalRequestHeaders = request.headers.newBuilder()
    conditionalRequestHeaders.addLenient(conditionName, conditionValue!!)

    val conditionalRequest = request.newBuilder()
    .headers(conditionalRequestHeaders.build())
    .build()
    return CacheStrategy(conditionalRequest, cacheResponse)
}
至此, Okhttp cache 分析完毕 可喜可贺。