二 协程的上下文
协程的上下文
这是协程系列第二篇,目录:
Kotlin coroutines 协程 学习笔记
上下文的集合特征
挂起点 Continuation 除了一个 resumeWith 方法,还有一个成员变量,类型为 CoroutineContext 。
关于上下文的定义,许多地方都比较虚,比如 Android 中的 context,Spring 中的 ApplicationContext 。实际上,一般情况下的 context 指的是环境相关的通用数据资源的统一提供者。
比较虚,这里直接给出主观感受,实际上 CoroutineContext 可以理解为一个 hashMap,可以存取数据,例如我们之前写的 EmptyCoroutineContext,实际上就是一个空的容器:
var coroutineContext: CoroutineContext = EmptyCoroutineContext
以下是通常的用法:
// 代码
coroutineContext = coroutineContext.plus(CoroutineName("协程名称"))

// 运算符重载
coroutineContext += CoroutineExceptionHandler { _,_ ->
                                               // 异常处理器
                                              }
可以使用 plus 或者 += 来往该容器添加数据,可以看出其确实就是一个容器 。在以上例子中,我们第一个添加了一个协程名称的元素,第二个添加了一个协程的异常处理器,当使用该上下文的协程执行中出现异常时,就会调用该处理器。
上下文的集合实现
经过对源码的分析,实际上 CoroutineContext 是一个链表的数据结构,只不过与我们一般的链表略有不同,先来看看代码:
public interface CoroutineContext {

    // 根据 key 获取 element
    public operator fun <E : Element> get(key: Key<E>): E?

    /**
     * Accumulates entries of this context starting with [initial] value and applying [operation]
     * from left to right to current accumulator value and each element of this context.
     */
    /**
     * 可以简单理解为从 initial 开始从左到右遍历链表,对每个节点执行 operation 代码块
     * 代码块的第二个参数为节点的 elememt,第一个参数第一次调用为 initial,之后每次调用都为前一次调用的返回值
     * 假设有链表 a-b-c,调用 c.fold(1, {i,_ -> i+1}),会按照以下顺序调用回调,第二次开始的第一个参数为上一次调用的返回值
     * o(1, a) -> 2
     * o(2, b) -> 3
     * o(3, c) -> 4
     */
    public fun <R> fold(initial: R, operation: (R, Element) -> R): R

    /**
     * Returns a context containing elements from this context and elements from  other [context].
     * The elements from this context with the same key as in the other one are dropped.
     */
    /**
     * 将两个节点合并,之后会重点讲解该方法。
     */
    public operator fun plus(context: CoroutineContext): CoroutineContext =
        if (context === EmptyCoroutineContext) this else // fast path -- avoid lambda creation
            context.fold(this) { acc, element ->
                val removed = acc.minusKey(element.key)
                if (removed === EmptyCoroutineContext) element else {
                    // make sure interceptor is always last in the context (and thus is fast to get when present)
                    val interceptor = removed[ContinuationInterceptor]
                    if (interceptor == null) CombinedContext(removed, element) else {
                        val left = removed.minusKey(ContinuationInterceptor)
                        if (left === EmptyCoroutineContext) CombinedContext(element, interceptor) else
                            CombinedContext(CombinedContext(left, element), interceptor)
                    }
                }
            }

    /**
     * Returns a context containing elements from this context, but without an element with
     * the specified [key].
     */
    /**
     * 返回本 context 中的 key 对应的 element 剔除后其他 element 组成的 context
     */
    public fun minusKey(key: Key<*>): CoroutineContext

    /**
     * Key for the elements of [CoroutineContext]. [E] is a type of element with this key.
     */
    /**
     * element 对应的 key,带有对应 element 类型的泛型
     */
    public interface Key<E : Element>

    /**
     * An element of the [CoroutineContext]. An element of the coroutine context is a singleton context by itself.
     * context 中的一个 element,当某个 context 只有一个 context 时就是其本身
     */
    public interface Element : CoroutineContext {
        /**
         * A key of this coroutine context element.
         */
        /**
         * 对应的 key
         */
        public val key: Key<*>

        public override operator fun <E : Element> get(key: Key<E>): E? =
            @Suppress("UNCHECKED_CAST")
            if (this.key == key) this as E else null

        // 当只有一个 element 的 context 的遍历
        public override fun <R> fold(initial: R, operation: (R, Element) -> R): R =
            operation(initial, this)

        // 当只有一个 element 的 context 求补集
        public override fun minusKey(key: Key<*>): CoroutineContext =
            if (this.key == key) EmptyCoroutineContext else this
    }
}
之后我们将分为两个分支,一个是作为 context 的对象,一个是作为 elment 的对象,值得注意的是这两个都实现了 CoroutineContext 接口
2.1 作为 Context 的对象
1. EmptyCoroutineContext
代表该 Context 为空,也就是这个容器为 空,或者说链表为空,只是一个占位的节点,以下是代码:
public object EmptyCoroutineContext : CoroutineContext, Serializable {
    private const val serialVersionUID: Long = 0
    private fun readResolve(): Any = EmptyCoroutineContext

    public override fun <E : Element> get(key: Key<E>): E? = null
    public override fun <R> fold(initial: R, operation: (R, Element) -> R): R = initial
    public override fun plus(context: CoroutineContext): CoroutineContext = context
    public override fun minusKey(key: Key<*>): CoroutineContext = this
    public override fun hashCode(): Int = 0
    public override fun toString(): String = "EmptyCoroutineContext"
}
还是比较简单的,可以直接看出来,主要关注里面重写了 plus 方法,直接返回添加的另一个 Context ,因此我们调用 += 的时候实际上是返回另一个 context 或者 element 。
2. CombinedContext
这是重点,代表一个 Context 节点,也就是链表的节点,先来看代码:
internal class CombinedContext(
    private val left: CoroutineContext,
    private val element: Element
) : CoroutineContext, Serializable
首先看到,其装有一个 element,同时持有下一个 CoroutineContext 的引用,实际上就是一个链表,是 element 的装饰,为其加入 指针域 left 与链表操作的相关方法。
来看看其重写的几个方法:
override fun <E : Element> get(key: Key<E>): E? {
    var cur = this
    while (true) {
        cur.element[key]?.let { return it }
        val next = cur.left
        if (next is CombinedContext) {
            cur = next
        } else {
            return next[key]
        }
    }
}
就是一个根据 key 获取数据的方法,循环遍历链表,如果是 CombinedContext,则尝试在其 element 字段中寻找 key,否则直接返回 节点 中 为 key 的对象(可能为空)。这里 [key] 实际上还是调用的 get 方法,而我们知道 element 是实现 CoroutineContext 类型,因此这里可以看成一个递归的过程 。
/**
     * 可以简单理解为从左到右遍历链表,对每个节点执行 operation 代码块,其中 代码块第一个参数初始为 initial,之后每次都是前一个代码块的返回值
     * 代码块的第二个参数为节点的 elememt,第一个参数第一次调用为 initial,之后每次调用都为前一次调用的返回值
     * 假设有链表 a-b-c,调用 c.fold(1, {i,_ -> i+1}),会按照以下顺序调用回调,第二次开始的第一个参数为上一次调用的返回值
     * o(1, a) -> 2
     * o(2, b) -> 3
     * o(3, c) -> 4
     * 。一般用于根据原链表来操作新的链表,其中 initial 传入初始头结点,然后在遍历中对当前维护的新链表做操作,并把新的头结点返回。
     */
public override fun <R> fold(initial: R, operation: (R, Element) -> R): R =
        operation(left.fold(initial, operation), element)
这里的 fold 就是一个递归的过程 。值得注意的是,这里先调用回调,然后执行的递归,因此回调的执行顺序是相反的,也就是从左到右的遍历(因为这里链表指针域为 left,因此认为头结点在右边),实际上这里回调的返回值为整个方法的返回值,会决定下次递归的 initial 方法,因此最终效果为根据调用 fold 的链表的节点数量调用相应次数的回调,其中回调的第一个参数初始为传入的参数,之后每一次回调都是上一次回调的返回值,而第二个参数就是链表的节点 element,从左到右。具体效果看上面注释。一般用于根据原链表构造新的链表,其中 initial 传入初始头结点,然后在遍历中往节点后面添加值。
public override fun minusKey(key: Key<*>): CoroutineContext {
    element[key]?.let { return left }
    val newLeft = left.minusKey(key)
    return when {
        newLeft === left -> this
        newLeft === EmptyCoroutineContext -> element
        else -> CombinedContext(newLeft, element)
    }
}
这是个找补集的方法,值得注意的是,这个链表的 key 是不允许重复的,因此如果当前节点就是要剔除的节点,则直接返回下一个节点 。然后递归调用下一个节点寻找补集,然后分类讨论,这里我们举例说明,直接说明有点困难。
以下 E 代表 EmptyCoroutineContext,这里假设链表中的节点都为 CombinedContext,实际上最后一个节点可以不带指针域,直接为 Element 本身,之后会详细分析。
- 假设链表的 Key 为 a-b-c,此时头结点为 c,我们调用 c.minusKey(c),则会直接返回 left,也就是 a-b
- 假设链表的 Key 为 E-a,此时头结点为 a,我们调用 a.minusKey(a),则会返回 left,这里如果为空则为 EmptyCoroutineContext
- 假设链表的 Key 为 a-b,此时头结点为 b,我们调用 b.minusKey(a),则会递归调用上一条,newLeft 为 EmptyCoroutineContext,来到 when 第二条分支,也就是直接返回 element,也就是不带指针域的 b
- 假设链表的 Key 为 a-b-c,此时头结点为 c,我们调用 c.minusKey(a),则会递归调用上一条,上一条会返回不带指针域的 b,也就是来到 when 第三条分支 (原本的 left 带指针域),会构造一个新的 CombinedContext,其中 left 为 不带指针域的 b,element 也就是 c,因此结果为 b-c
- 假设链表的 Key 为 a-b-c-d,头结点为 d,我们调用 d.minusKey(b),则会递归调用上一条,最终会返回 b-c,也就是带指针域的 c,回来到 when 的第一条分支,直接原样返回,也就是返回 b-c-d
以上过程仅供参考,实际中会出现一些情况,比如最后一个节点可以不带指针域等情况。
接下来的方法比较简单了,直接给出代码即可:
private fun size(): Int {
    var cur = this
    var size = 2
    while (true) {
        cur = cur.left as? CombinedContext ?: return size
        size++
    }
}

private fun contains(element: Element): Boolean =
get(element.key) == element

private fun containsAll(context: CombinedContext): Boolean {
    var cur = context
    while (true) {
        if (!contains(cur.element)) return false
        val next = cur.left
        if (next is CombinedContext) {
            cur = next
        } else {
            return contains(next as Element)
        }
    }
}
3. Element 本身
当一个链表只有一个节点时,其直接不带指针域,也就是直接 Element 本身作为一个 context,让我们来重新分析一下 plus 方法:
一般 element 并不会重写该方法,因此该方法一般就为接口定义的默认方法,有了以上的知识我们可以很快看懂下面的代码。
public operator fun plus(context: CoroutineContext): CoroutineContext =
		// 如果添加为空,则直接不作任何处理
        if (context === EmptyCoroutineContext) this else // fast path -- avoid lambda creation
			// 根据以上规则运行回调,其中第一个参数为 this,也就是遍历一遍 context,每次都在 this 中构造补集
            context.fold(this) { acc, element ->
                // acc 为 this 删除部分后的节点
                val removed = acc.minusKey(element.key)
                // 根据情况决定下一次运行的 acc 参数
                if (removed === EmptyCoroutineContext) element else {
                    // make sure interceptor is always last in the context (and thus is fast to get when present)
                    val interceptor = removed[ContinuationInterceptor]
                    if (interceptor == null) CombinedContext(removed, element) else {
                        val left = removed.minusKey(ContinuationInterceptor)
                        if (left === EmptyCoroutineContext) CombinedContext(element, interceptor) else
                            CombinedContext(CombinedContext(left, element), interceptor)
                    }
                }
            }
4. 总结
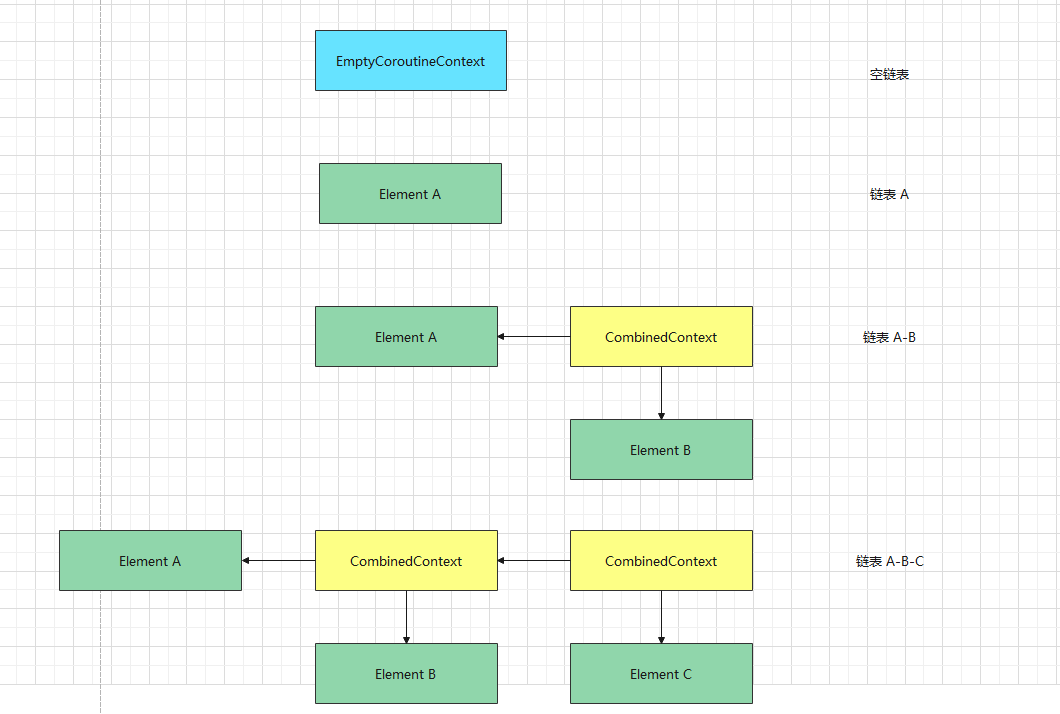
可以说这部分把链表玩出了花,当链表中没有数据时,值为 EmptyCoroutineContext,当只有一个 节点时,直接就是 Element 本身(这也是 Element 实现了 CoroutineContext 接口的原因),当有多个节点时,最后一个节点为 Element 本身,前面的节点都为 CombinedContext,截图如下图:
2.2 作为 Element 的对象
Element 就是具体的 Context 内容,Kotlin 中自带一些 Element 给我们使用,包括定义协程名称id,定义异常处理器,定义拦截器等,先来看看最简单的协程名称id
2.2.1 CoroutineName
public data class CoroutineName(
    val name: String
    // 继承 AbstractCoroutineContextElement 传入自己的 伴生对象
) : AbstractCoroutineContextElement(CoroutineName) {

    // 通过伴生对象确定 Key,这里 Key 必须为对应类型,泛型需要为自身
    public companion object Key : CoroutineContext.Key<CoroutineName>


    override fun toString(): String = "CoroutineName($name)"
}
很简单,我们来看看 AbstractCoroutineContextElement 的代码:
public abstract class AbstractCoroutineContextElement(public override val key: Key<*>) : Element
也是很简单,毕竟只是存数据的 元素,直接将 key 放到构造方法中而已。
2.2.2 CoroutineExceptionHandler
public interface CoroutineExceptionHandler : CoroutineContext.Element {
    /**
     * Key for [CoroutineExceptionHandler] instance in the coroutine context.
     */
    public companion object Key : CoroutineContext.Key<CoroutineExceptionHandler>

    /**
     * Handles uncaught [exception] in the given [context]. It is invoked
     * if coroutine has an uncaught exception.
     */
    public fun handleException(context: CoroutineContext, exception: Throwable)
}
这只是一个异常处理器,通过伴生对象表示 key 为 CoroutineExceptionHandler 的泛型,当我们实际使用的时候需要调用一个方法:
public inline fun CoroutineExceptionHandler(
    crossinline handler: (CoroutineContext, Throwable) -> Unit
): CoroutineExceptionHandler =
    object : AbstractCoroutineContextElement(CoroutineExceptionHandler), CoroutineExceptionHandler {
        override fun handleException(context: CoroutineContext, exception: Throwable) =
            handler.invoke(context, exception)
    }
通过内部匿名类的方式,继承了 AbstractCoroutineContextElement 的同时也实现了 CoroutineExceptionHandler 方法
2.2.3 ContinuationInterceptor
拦截器是所有 element 中最为重要的部分,以下是代码:
public interface ContinuationInterceptor : CoroutineContext.Element {
    /**
     * The key that defines *the* context interceptor.
     */
    companion object Key : CoroutineContext.Key<ContinuationInterceptor>


    /**
     * 包装方法,当执行前会将原 continuation 传入,然后将返回的 continuation 替换
     */
    public fun <T> interceptContinuation(continuation: Continuation<T>): Continuation<T>


    public fun releaseInterceptedContinuation(continuation: Continuation<*>) {
        /* do nothing by default */
    }

    // 主要是 key 可以为 AbstractCoroutineContextKey 类型,这里做了一下特殊判断和强制类型转换
    public override operator fun <E : CoroutineContext.Element> get(key: CoroutineContext.Key<E>): E? {
        // getPolymorphicKey specialized for ContinuationInterceptor key
        @OptIn(ExperimentalStdlibApi::class)
        if (key is AbstractCoroutineContextKey<*, *>) {
            @Suppress("UNCHECKED_CAST")
            return if (key.isSubKey(this.key)) key.tryCast(this) as? E else null
        }
        @Suppress("UNCHECKED_CAST")
        return if (ContinuationInterceptor === key) this as E else null
    }


    public override fun minusKey(key: CoroutineContext.Key<*>): CoroutineContext {
        // minusPolymorphicKey specialized for ContinuationInterceptor key
        @OptIn(ExperimentalStdlibApi::class)
        if (key is AbstractCoroutineContextKey<*, *>) {
            return if (key.isSubKey(this.key) && key.tryCast(this) != null) EmptyCoroutineContext else this
        }
        return if (ContinuationInterceptor === key) EmptyCoroutineContext else this
    }
}
还是有点抽象,这里我们做一个简单的演示,首先写一个 launch 方法用于启动协程:
fun launch(
    context: CoroutineContext = EmptyCoroutineContext,
    block: suspend ()->Unit){
    block.startCoroutine(object: Continuation<Unit> {
        override val context: CoroutineContext
            get() = context

        override fun resumeWith(result: Result<Unit>) {
            result.getOrNull()
        }
    })
}
然后我们写一个拦截器:
class ThreadInterceptor: ContinuationInterceptor {
    override fun <T> interceptContinuation(continuation: Continuation<T>): Continuation<T> {
		// 包装类,在新线程中执行代理对象中的原方法
        return object: Continuation<T> by continuation {
            override fun resumeWith(result: Result<T>) {
                thread {
                    continuation.resumeWith(result)
                }
            }
        }
    }

    // 直接使用 ContinuationInterceptor 的伴生对象
    override val key: CoroutineContext.Key<*>
        get() = ContinuationInterceptor
}
然后我们使用一下:
fun main(){
    println("1 ${Thread.currentThread()}")
    var context: CoroutineContext = EmptyCoroutineContext
    context += ThreadInterceptor()
    launch (context){
        Thread.sleep(1000)
        println("2 ${Thread.currentThread()}")
    }

    println("3 ${Thread.currentThread()}")

}
可以发现输出结果:
1 Thread[main,5,main]
3 Thread[main,5,main]
2 Thread[Thread-0,5,main]
我们将该拦截器去掉看看:
fun main(){
    println("1 ${Thread.currentThread()}")
    var context: CoroutineContext = EmptyCoroutineContext
    //context += ThreadInterceptor()
    launch (context){
        Thread.sleep(1000)
        println("2 ${Thread.currentThread()}")
    }
    println("3 ${Thread.currentThread()}")
}
以下是结果:
1 Thread[main,5,main]
2 Thread[main,5,main]
3 Thread[main,5,main]
可以看到拦截器起了作用,实际上,拦截器才是协程的最精髓所在,我们之前的演示代码中,cps 变换中的挂起点变换,我们都需要手动使用 thread{} 来开异步线程,也就是说,协程除了挂起点的变换,没有对线程做任何处理,还是我们需要手动开启线程。但是有了拦截器,我们可以在拦截器中制定这个协程体需要执行的线程,或者说制定 resumeWith 方法执行的所在位置,这里面可以使用线程池,handler 发送给 looper 等操作(在安卓的协程中 withContext 也是使用类似思路实现),这也是协程的使用的关键组件之一。
至此,协程的基础已经介绍完毕,之后都是协程的使用,可以明确的看到协程这个库的设计就和 Thread 不一样,这也是我前面提到的,我们可以使用的工具基本上就这些,但我们可以使用这些来构造千奇百怪的协程工具来进行异步操作。例如我上面提到的 launch,实际上也是一种工具,对基础设施进行了初步的封装。
下一节开始,将重点开始讲解协程工具的设计思路。